Close this window to return to series
100 project listing |
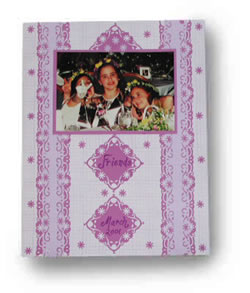
Delicate
Lacey Friends Page
by Andrea Rothenberg, CCD, CPD |
| Materials
Needed |
 |
| |
 |
Fiskars Flower Continuous Border Punch |
| |
|
Fiskars 12” Portable Paper Trimmer |
| |
|
Fiskars Glue Pen |
| |
|
8 ½ x 11 paper for page |
| |
|
2 sheets of dark paper, 1 sheet of light
coordinating papers |
| |
|
Photo, approx. 5 ½” x 3
¾” |
| |
|
|
| |
|
|
| |
| Instructions
|
| |
1. |
Crop your photo to size using the paper trimmer. Cut
a sheet of the darker paper ¼” larger than the photo
all the way around. Glue the photo to the paper, centering it. |
| |
2. |
From the darker paper, cut 5 strips 2” x 11”
and 3 2 ½” squares. Begin on one long edge of a strip,
in the center. Use the border punch to punch the design along the
whole length. Make sure that you match up the design with the imprinted
design on the punch as you go. Continue the design over the edge.
Flip the strip over to punch the other side. Make sure to center
the first punch with the center of the design on the other side.
There is a small raised mark to use on the center of the punch.
Repeat for the other strip. Punch the design on one side of the
2 ½” square. Flip it over and punch the center of the
opposite side. Punch the remaining 2 sides, centering the design.
Repeat for the other 2 squares. |
| |
3. |
From the lighter paper, cut 2 strips 1 ½”
x 11”. Punch the strip as you did the darker strips. Glue
the lighter, smaller strips in the center of the darker ones. |
| |
4. |
Assemble your page, first gluing down the 2 strips
approximately ½” from the sides. Glue 1 square at the
top of the photo at an angle as pictured. Glue the photo to the
top of the page. Glue the 2 squares below the photo. Glue some of
the flowers that were punched from the border punch around the page
as desired. Use a marker to add your desired journaling. |
|