Close this window to return to series
100 project listing
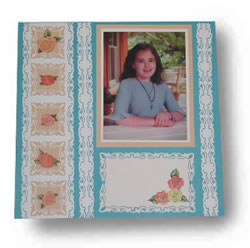
Lacey
Roses by Andrea Rothenberg, CCD, CPD
Create a beautiful and
delicate page with punches and easily stick all of the intricate
and vellum pieces in position with the New Xyron® 900 Machine.
Materials
Needed
Xyron® 900
Xyron® 900 Acid Free Cartridge
Fiskars Elegance Continuous Border Punch
12” x 12” paper for page
12” x 12” white paper for
designs
beige paper for designs
DMD, Paper Reflections® Roses Vellum
Die Cuts
5” x 7” Photograph
Instructions
1.
Cut a piece of white paper 5 ½” x 7 ½”
and a piece of beige paper 6” x 8”. Run the photo and
each paper piece through the Xyron® machine. Adhere the photo
to the center of the white and the white to the center of the beige
paper. Keep the beige piece on its backing until ready to adhere
to the page.
2.
From the white 12” x 12” paper cut 2 strips
1 ¼” x 12”, a 4” x 6” rectangle and
a 3 ½” x 12” strip. Use the border punch to punch
a continuous design down the long side of a strip. Flip the strip
over to punch the same design on the opposite side. Line up the
design by centering the punched design with the raised center marking
on the punch. Be sure to continue the design off the edges of each
strip. Repeat the design on the edge of each long strip. Punch the
corners of the rectangle first. Line up the corner of the paper
with the marking on the punch at each side of the design area. You
may want to practice the corner punch design on a scrap paper to
make sure of the design you will get from your marked area. When
all corners have been punched, punch the design in the center of
each side. The design will overlap some of the corner design area.
3.
Cut five 2 ½” squares from the beige
paper. Punch one side of a square by centering it in the punch.
Punch the design in the center of the opposite side of the square.
Punch the remaining sides of the square one at a time. Repeat for
all 5 squares.
4.
Run all of the punched strips and squares through
the Xyron® Machine. Before removing the clear mask, rub your
fingers around the punched design areas to make sure that the excess
adhesive will be removed onto the mask when taken off. Run the vellum
roses through the Xyron® Machine also.
5.
Begin putting the page together by peeling off the
protective mask form the pieces. Lay a thin strip on the right side
¼” from the edge. Place the wide strip on the left
side ¼” from the edge. Place the last thin strip ½”
from the wide one. Adhere the matted photo to the upper open area
¼” from the top. Add the rectangle centered in the
area below the photo. Add the squares evenly spaced inside the wide
strip. Add the roses in the squares and throughout the page.