Close this window to return to series
100 project listing |
"Daddy
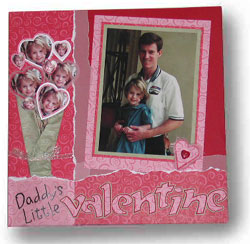
and Me" Valentines Layout
by Eastmen Kodak Company |
| Materials
Needed |
 |
| |
 |
Your favorite Daddy and daughter picture
|
| |
 |
Paper: |
| |
 |
12" x 12" red cardstock |
| |
 |
12" x 12" Scroll Dark design
in Deep Red by Making Memories |
| |
 |
12" x 12" Scroll Light design
in Deep Red by Making Memories |
| |
 |
Green marbled paper by K & Company |
| |
 |
12" x 12" light pink vellum
by Paper Garden |
| |
 |
Green and pink mulberry paper by Printworks |
| |
 |
Black lettering stickers – David
Walker by Colorbook |
| |
 |
Calligraphy 11/2" lettering template
by ScrapPagerz |
| |
 |
Green and red wire by Artistic Wire |
| |
 |
Red heart button by Hill Creek Designs |
| |
 |
Hermafix double-sided adhesive squares |
| |
 |
Mini Pop-Dots by All Night Media |
| |
 |
Embroidery needle and pink embroidery
floss by DMC |
| |
 |
Ribbon |
| |
 |
Q-Tips |
| |
| Instructions
|
| |
1. |
Find a picture you love
Choose your favorite picture of daddy and daughter, and take it
to the nearest KODAK Picture Maker. Touch the screen to start, and
follow the on-screen directions to make a 5" x 7" print. |
| |
2. |
Make your accent pictures
With the same picture on the KODAK Picture Maker, Zoom & Crop
to feature your daughter’s face close up. Print two sheets
of picture stickers – each sheet will include two different
sizes of stickers. |
| |
3. |
Begin your layout
Cut two 4" x 12" strips of pink vellum. Tear each along
one 12" side for a rough, uneven effect. Adhere these strips
along the bottom and left side of the red 12" x 12" cardstock.
|
| |
4. |
Add layers
Cut two 3" x 12" strips of Scroll Dark paper and tear
each along one 12" side. Adhere these strips on top of the
vellum strips, lining them up along the bottom and left side of
the page.
Cut one 3" x 31/2" piece of Scroll Light paper and
tear along one 31/2" side. Adhere in the lower left corner,
on top of the Scroll Dark paper strips. This is where the “Daddy’s
Little” part of your title will go. |
| |
5. |
Create your title
Cut a 21/2" x 3" piece of pink vellum and tear along
one 3" side. Place black lettering stickers on this piece,
spelling “Daddy’s Little.” Using an embroidery
needle and one strand of pink embroidery floss, make one cross
stitch on each of the four corners to adhere the vellum to the
lower left corner of the layout.
Flip a lettering template so the letters read backwards, and
use pencil to trace the word “Valentine” onto the
back side of the Scroll Light paper. Cut out the letters, mat
them onto solid red cardstock and cut again, leaving a small border
around each letter. Mat again on the green marbled paper and cut.
Adhere the letters to the Scroll Dark paper strip along the bottom
of the layout using Mini Pop-Dots to raise the lettering. |
| |
6. |
Prepare the main photo
Triple mat the main photo and adhere it to the red cardstock. |
| |
7. |
Make the bouquet
Cut a 4” x 6” piece of green mulberry paper to be the
paper holding your “flowers” together. Fold the edges
over in front to create a pocket.
Cut the KODAK Picture Maker picture stickers out in heart shapes
and mat them on the various papers as shown in the layout. Adhere
each heart-shaped “flower” to a piece of green wire
to be a stem. (Double-sided adhesive squares will work.)
Place the wired “flowers” inside the mulberry pocket
and tie with a ribbon. Tuck the end of the bouquet under the pink
patterned paper along the bottom of the layout. Put adhesive on
back of the mulberry paper to adhere it to the background. Put
Mini Pop-Dots behind each “flower” to make them stand
out from the page. Adhere to the page. |
| |
8. |
Finish with a heart
accent
Cut a heart out of the Scroll Light paper. Mat it on red cardstock,
then pink mulberry paper. Fray the edges of the mulberry paper by
wetting it in a heart shape with a wet Q-Tip. Attach a red heart-shaped
button to the heart accent with a small piece of red wire. Twist
on back to secure. Adhere with Mini Pop-Dots to the bottom right
corner of the main photo. |