Fiskars ShapeBoss™ Oval-Serenity
ShapeBoss™ Embossing Stencil Set
Fiskars Clouds Paper Edger
12” x 12” sheet of apricot
color paper
4” x 5” piece of apricot
color paper
ruler
scissors
Instructions
1.
Crumple and re-crumple the sheet of copper foil in
your hands until you have your desired texture. Lay the crumpled
foil on a flat surface and flatten it out without pressing too hard
to lose the texture. With regular scissors, cut an 11” x 2”
strip. Follow the manufacturer’s instructions to use the ShapeCutter™
and the oval template to cut out 3 of the 3” x 4” ovals
from the crumpled foil. It can be easier to cut foil with the Shapecutter™
with a sheet of scrap paper on top of the foil.
2.
Cut three 2 ½” x 3 ½” ovals
from black foil. Use the ruler and scissors to cut an 11”
x ½” strip of black foil.
3.
Use adhesive to stick the black oval in the center
of the copper oval. Stick the copper oval onto silver foil leaving
approx. ½” of foil around it. Use the Paper Edger to
cut a scalloped mat around the copper oval. Repeat for the other
2 sets of ovals. Use the 2 ¼” x 3” oval template
to cut out your photographs, adhere them in the center of the black
oval.
4.
Cut a 6” x 7” piece of silver foil. Following
the manufacturer’s instructions of your ShapeBoss™,
place the foil right side down in the center oval design between
the stencil templates. Use the stylus to emboss the oval design
into the foil. Remove the embossed design and cut around it with
the paper edgers to make it a scalloped oval shape. Cut a 3”
x 4” oval from the piece of apricot paper. Adhere it in the
center of the embossed oval.
5.
Cut two 2” squares from silver foil. Cut the
squares in half from corner to corner to make 4 triangles. Choose
a small design on the embossing template to fit in the triangles
and emboss each one.
6.
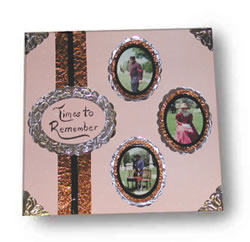
Assemble the page: Adhere the copper strip on the
left side of the page, 2” from the edge. You will need to
cut in the center so that the ends will reach the top and bottom
edges of the page. Adhere the black strip in the center of the copper,
cutting it also. The embossed oval with the paper center goes in
the center of the copper strip. Adhere a corner piece in each of
the 4 corners. Use a marker for journaling in the center oval.
7.
Arrange the photo ovals on the right side as desired
and adhere them in place.