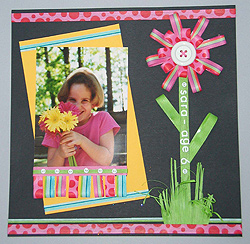
Ribbon Scrapbook Page
|
| Materials
Needed |
|
 |
Cream City Self-Adhesive
Ribbon in the following colors:
|
| |
Hot-Dot Bubblegum/Red
Cool Stripe
Hot Stripe
Lime
Bubblegum
|
|
(1) 12”x 12” sheet black
cardstock |
|
(1) 9 ¼” x 5 ½”
sheet goldenrod cardstock |
|
(1) jumbo white button |
|
(6) mini white buttons |
|
small white rub-on alphabet letters
|
|
adhesive dots |
|
baby powder |
|
scissors |
|
trimmer |
|
photo adhesive |
|
ruler |
| |
| Instructions
|
| To create the flower: |
| 1. |
1. Cut four 9” strips of the Hot Stripe ribbon.
Remove adhesive backing from one strip and fold both ends of ribbon
to the middle of the adhesive side, forming two loops. Coat the
inside adhesive edge of loops with baby powder to keep them from
sticking to one another. Repeat with three other strips. Adhere
strips to one another in a criss-cross fashion using Mini Glue Dots.
This will form the outer petals of the flower. |
| 2. |
2. Cut eight 2 ½” strips of the Hot Dot
Bubblegum/Red ribbon. Remove adhesive backing from one strip and
adhere ends together, forming a loop. Coat inside edges with baby
powder; repeat with seven other strips. Using Mini Glue Dots, adhere
Hot Dot loops to the Hot Stripe flower petals, overlapping them
in a circular pattern. This will form the inner layer of petals.
3. Shred a long, thin strip from the Bubblegum ribbon; thread through
the holes of the jumbo button to mimic a sewn look. Using a Pop-up
Glue Dot, adhere button to center of ribbon flower.
|
To create the
stem and leaves: |
| 1. |
1. Cut an 8” strip of Lime ribbon. Use rub-on
alphabet letters to create the title of your choice. (Hint:
You may also print your title directly onto the ribbon using an
ink-jet printer, or you may rubber stamp a title or design.)
Remove adhesive backing and adhere stem to black page. Accent title
with two mini buttons (adhered to ribbon with Mini Glue Dots) if
desired. |
| 2. |
2. Cut two 6” strips of Lime ribbon. Remove
adhesive backing from one strip and adhere ends together, forming
a loop that will become a leaf. Coat inside edges with baby powder;
repeat with other strip. Trim ends of leaves on a diagonal so they
will line up flush with the stem. Using Mini Glue Dots, adhere Lime
loops to each side of the stem. Cut a 12” strip of Hot Dot
Bubblegum/Red ribbon; adhere approx. ½” from top of
page. Attach flower to page so that it conceals the top part of
the stem. Cut a 12” strip of the Cool Stripe ribbon; shred
a thin piece and adhere it across the page approx. 1 ½”
from the bottom. |
To create the
grass: |
| 1. |
1. Cut five strips of Lime ribbon of various lengths
(between 3”- 5”.) Remove adhesive backing and adhere
strips together to form a “patch of grass.” Shred the
ends of the ribbon into thin strips to create the grass blades.
Vary the length and curl direction of each strip to achieve a more
realistic effect. Coat the ends of the blades with baby powder,
but leave the bottom half of the grass sticky. Adhere the patch
of grass over the bottom of the flower stem. Cut a 12” strip
of Hot Dot Bubblegum/Red ribbon; adhere near bottom of page to cover
the bottom edge of the patch of grass. |
To create the
photo mat: |
| 1. |
1. Cut two 6” strips of the Cool Stripe ribbon;
remove adhesive backing and shred a thin strip from each piece.
Adhere to top and bottom of goldenrod cardstock. |
| 2. |
2. Cut three 2 ½” strips of Hot Dot Bubblegum/Red,
three 2 ½” strips of Cool Stripe, and two 2 ½”
strips of Hot Stripe ribbon. Remove adhesive backing from one strip
and adhere ends together, forming a loop. Coat inside edges with
baby powder; repeat with seven other strips. Using Mini Glue Dots,
adhere loops to bottom edge of photo. |
| 3. |
3. Cut a 5 ½” strip of Bubblegum ribbon;
remove adhesive backing and attach to bottom of photo, covering
the ends of the ribbon loops. Shred a thin strip of Lime ribbon
and adhere along center of Bubblegum ribbon to create a stripe.
Adhere six mini buttons to Lime stripe using Mini Glue Dots. Attach
photo to goldenrod mat with photo adhesive; adhere mat to page. |
| |
|
| Sponsor:
Cream City Ribbon |