Pumpkin Halloween Page Designed by Miriam Campbell
Materials
Needed
Halloween Collection
papers - Heidi Grace Designs
Flocked die-cut tags – Heidi Grace
Designs
Cardstock stickers – Heidi Grace
Designs
Seagull and Clouds decorative edge scissors
– Fiskars® Brands, Inc.
Adhesive
Trims and ribbons are all
the rage in scrapbooking, but can become expensive.
Dust off your decorative scissors and get the look of “trims”
with patterned papers.
This technique can be done with any type of paper – striped
patterns of either text or themed images work well.
For a distressed look, cut your paper with decorative scissors,
then lightly sand the shaped edges.
Give die-cuts with straight edges a new look by shaping them with
decorative scissors. Snipping one edge will do the trick –
then sand. Try it with stickers, too.
Instructions
1.
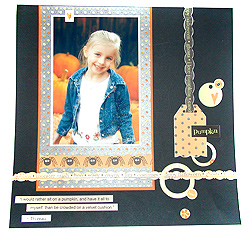
1. Cut between striped images with decorative scissors.
With seagull scissors cut along he spider images, creating a somewhat
symmetrical decorative strip (or trim). This will be used on a photo
mat.
2.
2. With seagull scissors again find printed text on
orange patterned paper. Cut along the text as in Step 1. Flip paper
around and cut on the other side of the text. This will be used
as a 12” border strip.
3.
3. Sand edges of decorative strips for a distressed
look. Hold black text strip in one hand and sandpaper in the other,
lightly distress shaped edges. This same strip will be threaded
through the die-cut tag in Step 4
4.
4. With cloud scissors cut the bottom edge of the
die-cut tag. Sand the decorative edges of the tag. Use the strip
from Step 3 and thread it through the tag opening – like a
ribbon.