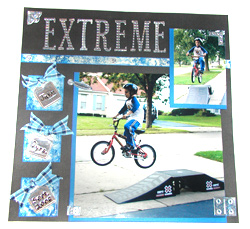
Extreme Scrapbook Page
Designed by Karlene Olsen
Presented by Stacy Caron
|
| Materials
Needed |
|
 |
Wizard – W 000, Spellbinders
Papercrafts, Inc. |
|
Indulgence Font – L3 01, Spellbinders
Papercrafts, Inc. |
|
Hardware Hinges – S3 101, Spellbinders
Papercrafts,Inc. |
|
Tags 5 - S4 031, Spellbinders Papercrafts,
Inc. |
|
Square Geometric – S4 006 Spellbinders
Papercrafts, Inc. |
|
Circle & Square Texture Plate –
T3 002 Spellbinders Papercrafts, Inc. |
|
Copper Foil (silver backside) Spellbinders
Papercrafts, Inc. |
|
Warm Green, Burnt Sienna Fluid Chalk
Ink |
|
Micro Tip Scissors – Fiskars®
Brands Inc. |
|
Black Gelly Roll Glaze Pen |
|
Heritage & Hawaiian Doublemates
Cardstock |
|
Brook Blue Polished Stone Paper |
|
Royal Blue ink |
|
Stonewashed Alcohol Ink |
|
Permanent Adhesive Squares |
|
Blue, green and white cardstock |
|
Cutterpede 12” cutting system |
|
Blue plaid wired ribbon |
|
Zip Dry Paper Blue |
| |
|
| |
| Instructions
|
| 1. |
1. Crop large photo to 8” x 8” size. Crop
smaller picture to 4” x 3”. |
| 2. |
2. Cut one Hawaiian Blue Doublemate Cardstock to 8
¼” x 8 ¼” and one piece to 4 ¼”
x 3 ¼” to create the photo mounts. Lightly ink the
edges of the cardstock with Royal Blue Ink. |
| 3. |
3. Using permanent adhesive, adhere photos even with
the upper right corner of the Hawaiian blue cardstock photo mounts.
(Leaving blue cardstock showing on the bottom and left sides). |
| 4. |
4. Cut ½” wide strip of Brook Blue polished
stone paper. Lightly ink the edges of the polished stone paper strip
with the royal blue ink pad. |
| 5. |
5. Adhere the large mounted photo to the bottom right
side of the Heritage Black Doublemates cardstock using a permanent
adhesive. |
| 6. |
6. Adhere the ½” Blue Polished Stone
strip above the large photo using permanent adhesive. |
| 7. |
7. Use foam adhesive strips to adhere the smaller
mounted photo to the upper right corner of the layout. (overlapping
the larger photo and the ½ strip). |
| 8. |
8. Die Cut and Emboss 3 qty. Spellbinders’ Geometric
Square Dies wit the Blue Polished stone Paper. Lightly ink the edges
of these 3 die cuts wit the Royal Blue ink. |
| 9. |
9. Enhance Spellbinders’ Silver Metal Foil with
Stonewashed Alcohol Ink by squirting several drops of Alcohol Ink
onto the Alcohol Applicator. Dabbing the Applicator up and down
and side to side, apply the blue ink in a random pattern to the
silver foil. Let dry for a few minutes. |
| 10. |
10. Die Cut and Emboss 3 qty. of the scalloped edge
tags from the Spellbinders’ Tag 5 die using Spellbinders’
Silver enhanced Metal Foil. |
| 11. |
11. Using a toothpick or pointed end of a small stick,
write into the center of the foil tags your journaling. This will
leave an indentation. Fill in your indented journaling with the
Black Gelly Roll Glaze Pen. Let glaze ink dry. |
| 12. |
12. Die Cut the “EXTREME” from Spellbinders’
Silver Enhanced Metal Foil using the Spellbinders’ Indulgence
Font |
| 13. |
13. Emboss the “EXTREME” letter die cuts
with the Spellbinders’ Circle & Square Texture Plate. |
| 14. |
14. Using a permanent adhesive, adhere the ‘EXTREME’
die cuts to the area above the ½” strip of blue marble
paper. |
| 15. |
15. Tie blue plaid ribbon to the die cut journaling
tags. Adhere tags to the Square Die Cuts using a permanent adhesive. |
| 16. |
16. Adhere the Squares with Tags to the left side
(below the ½” strip and next to the large mounted photo). |
| 17. |
17. Die Cut and Emboss the Spellbinders’ Hardware
Hinges die using the Spellbinder’s Silver enhanced Metal foil |
| 18. |
18. Adhere the Hardware Hinges die cuts throughout
the layout. |
| |
|
| Sponsor:
Spellbinders Papercrafts, Inc. |