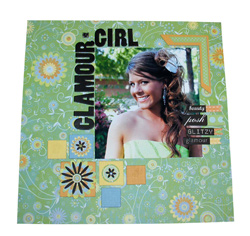
Glamour Girl
12” x 12” Page
Designed by Betsy Veldman
Presented by Nancy Hill
|
| Materials
Needed |
|
 |
DCWV Inc. Pocket Full of Green Glittered
Cardstock – one 12” x 12” Sheet and 2 –
Hand-cut Pocket Full of Green Flowers |
|
DCWV Inc. Black Textured Cardstock |
|
DCWV Inc. Printed Adhesive Cardstock
Ribbon |
|
DCWV Inc. Yellow 3 Chipboard Mat Stack
Sheet cut into 1 – 1 ¼” x 1 ¼” Square,
and 1 – 1” x 1” Square |
|
DCWV Inc. Blue 3 Chipboard Mat Stack
Sheet cut into 1 – 1 ¼” x 1 ¼” Square,
and 1” x 1” Square |
|
DCWV Inc. Harvest Orange 3 Chipboard
Mat Stack Sheet cut into 1 – 2” x 2” Square, 1
– 1” x 1” Square, and one 3” x 3 ½”
Photo Corner |
|
DCWV Inc. Chipboard Sayings Stickers |
|
DCWV Inc. Black Chipboard Adhesive Letters |
|
Small Flower Punch |
|
1” Circle Punch |
|
Personal Die Cut Machine |
|
Thick Cuts Flower, Daisies Die Cut |
|
DCWV Inc. Mini Brads – Blue &
Olive Green |
| |
|
| |
| Instructions
|
| 1. |
1. Adhere a 6 ½” x 6” unmatted
photo to the upper right side of the 12” x 12” sheet
of Pocket Full of Green glittered cardstock – see sample for
positioning. |
| 2. |
2. Spell out “Glamour Girl” with the Black
Chipboard Adhesive letters and position them around the left edges
of the photo – see sample for positioning. |
| 3. |
3. Cut squares out of the Yellow 3, Blue 3, and Harvest
Orange 3 Chipboard Mat Stack Sheets. |
| 4. |
4. Arrange and adhere the various sizes of chipboard
squares around the lower left side of the 6 ½” x 6”
photo – see sample for positioning. |
| 5. |
5. Cut a 3” x 3 ½” photo corner
out of the Harvest Orange 3 chipboard and adhere it to the upper
right side of the photo. |
| 6. |
6. Cut several pieces of Adhesive Cardstock Ribbon
at various lengths to accent the photo corner and the Chipboard
Sayings Stickers. |
| 7. |
7. Place the adhesive cardstock ribbon on the photo
corner and down the right edge of the photo – see sample for
positioning. |
| 8. |
8. Position 4 – Chipboard sayings on top of
the various lengths of adhesive cardstock ribbon that you have placed
along the right edge of the photo. |
| 9. |
9. Freehand cut 2 flowers from the Pocket Full of
Green Cardstock and adhere them to the chipboard squares on the
lower left side of the photo – see sample for positioning. |
| 10. |
10. Punch a 1” circle and a ½”
circle out of the Pocket Full of Green cardstock |
| 11. |
11. Adhere the 1” circle to one of the chipboard
squares. |
| 12. |
12. Using the small flower punch, punch 2 flowers
out of the Black cardstock. |
| 13. |
13. Using the Personal Die Cutting Machine and the
Thick Cuts Flower, Daisies die cut, cut 1 daisy out of the black
cardstock. |
| 14. |
14. Adhere the ½” circle you punched
out of the Pocket Full of Green cardstock to the center of the black
die-cut flower. |
| 15. |
15. Adhere the black flower to a large hand-cut flower
and adhere it to the largest chipboard square. |
| 16. |
16. Adhere a smaller hand-cut flower to one of the
smaller squares and adhere one of the small black flowers you punched
out with the small flower punch. |
| 17. |
17. Adhere the 1” circle you punched out of
the Pocket Full of Green cardstock to one of the smaller chipboard
squares at the lower left of the photo. |
| 18. |
18. Adhere the other small black flower you punched
out to the center of the circle. |
| 19. |
19. Adhere the circle with the flower in the middle
to one of the smaller chipboard squares. |
| 20. |
20. Attach a blue mini brad and an olive green mini
brad to the center of the small black flowers. |
| |
|
| Sponsor:
Die Cuts with a View Inc. |