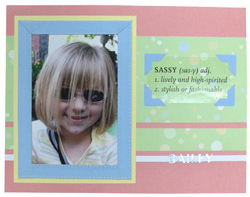
Bailey 8 ½”
x 11” Page Designed by Carlene Hunsaker
Presented by Nancy Hill
Materials
Needed
DCWV Inc. Coral Red 3 Textured Cardstock
cut to 8 ½” x 11”
DCWV Inc. Yellow 2 Textured Cardstock
cut to 7 ½” x 5 ½”
DCWV Inc. White Textured Cardstock cut
to ¼” x 11”
DCWV Inc. Blue 2 Textured Cardstock
cut into photo corners
DCWV Inc. Polka Dot Patterned Paper
cut to 3 ¾” x 11” and 1” x 11”
DCWV Inc. Light Blue Stitched Printed
Ribbon cut into 2 – 7” strips and 2 – 5”
strips with mitered edges
DCWV Inc. “Sassy” Clear
Adhesive Quote Sticker
Small Light Blue Alphabet Value Stickers
Personal Die Cutting Machine
Thin Cuts “Photo Corners”
die cut
Instructions
1.
1. Adhere the 3 3/4” x 11” and 1”
x 11” strips of polka dotted patterned paper to the center
of the 8 ½” x 11” sheet of Coral Red cardstock
– see sample for positioning.
2.
2. Adhere the ¼” x 11” strip of
white cardstock underneath the patterned paper strips – see
sample for positioning.
3.
3. Adhere the 7 ½” x 5 ½”
sheet of Yellow 2 cardstock on top of the patterned paper strips
off centered to the left – see sample for positioning
4.
4. Adhere a 5” x 7” Photo to the Yellow
2 cardstock.
5.
5. Remove the backing from the strips of Light Blue
Stitched adhesive ribbon.
6.
6. Position the printed ribbon strips around the outer
edge of the 5” x 7” photo – see sample
7.
7. Adhere the “Sassy” Clear Sticker Quote
to the 3 ¾” x 11” strip of patterned paper.
8.
8. Using the Personal Die Cutting Machine and the
Thin Cuts Photo Corners, cut 4 photo corners out of the Blue 2 cardstock.
9.
9. Adhere the Blue 2 photo corners to the four corners
of the “Sassy” Clear Sticker Quote
10.
10. Spell out the name of the person in your photo
with the small light blue alphabet value stickers and adhere them
to the strip of white cardstock.