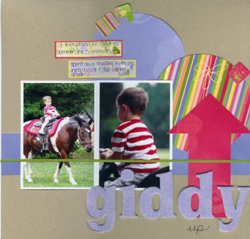
Giddy Up Scrapbook
Page
By Melanie Bauer
|
| Materials
Needed |
|
 |
paper trimmer |
|
6x12 inch acrylic ruler |
|
cd to use as template |
|
fine-tip scissors |
|
craft knife and self-healing mat |
|
1 piece of cardstock |
|
4 pieces of coordinating patterned paper |
|
fabric tape |
|
tab stickers |
|
journaling stickers |
|
chipboard alphabet letters |
|
pen |
| |
|
| |
| Instructions
|
| 1. |
1. Print 2 photos onto 4x6 photo paper. Set your printer
so that each photo is slightly smaller than the photo paper, leaving
an 1/8 inch white border around the photos. Trim if necessary. |
| 2. |
2. Using a cd as a template, lightly trace a circle
onto the back of 2 coordinating patterned papers. Cut the circles
out, using fine tip scissors and set aside. |
| 3. |
3. Cut a 2x12 piece of patterned paper from a third
patterned paper that you've selected. Adhere this patterned paper
strip to your cardstock 3/4 of an inch from the bottom, using a
6/12 inch acrylic ruler as a guide, ensuring that your strip is
even and level. |
| 4. |
4. Attach tab stickers to the circles you cut from
the patterned paper.
Attach one tab sticker to one of the circles and 2 tab stickers
to the second.
|
| 5. |
5. Adhere your circles to the cardstock, placing the
first to the right hand side of the page and so that it overlaps
the patterned paper strip. The second circle will be adhered so
that it is to the upper-left of the first and slightly tucked under
it. When you place your circles, ensure that the tab stickers are
facing in opposing directions. |
| 6. |
6. Adhere your photos to the cardstock 1" from
the left-hand edge and so that they extend 1/2 of an inch below
the 2x12 strip of patterned paper. Use your straight edge to ensure
the photos are level and straight. The photos will overlap the circles
slightly. |
| 7. |
7. Using your fourth piece of patterned paper and
your acrylic ruler, draw an arrow onto the back of the paper. The
base of the arrow is 2"wide with the leg standing 4" tall
and then extending 1" to each side, thus forming the base of
the arrow point. Next, place your ruler so that it is centered at
the midline of the arrow's leg (2" from either side) and measure
6 inches up from the midline. Lightly mark that 6" spot with
a pencil and, using your straight edge, connect that dot to the
end point of each extension. You now have your arrow. Using your
straight edge, craft knife and self-healing mat, cut your arrow
from the patterned paper. |
| 8. |
8. Attach the arrow to your cardstock, placing the
base of the point along the top edge of the 2x12 inch strip of patterned
paper. |
| 9. |
9. Cut a piece of fabric tape to 12.5 inches. Run
this tape along the 2x12 inch strip. It will run over the photos
and arrow also, pulling them together visually. Wrap the ends of
the tape over the cardstock edge. |
| 10. |
10. Adhere your chipboard alphabet for your title.
Place the chipboard so that it extended onto the other elements
at the bottom of the page. Use a pen and write the second word of
the layout in your own handwriting. |
| 11. |
11. Place journaling stickers above your photos so
that they slightly overlap the second circle. Add your journaling
and you're done! |
| |
|
| Sponsor:
Fiskars Brands, Inc. |