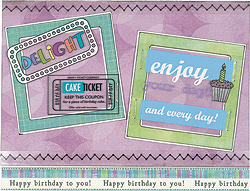
Enjoy Your
Day Card
Designed by Shauna Berglund-Immel
Presented by Sara Naumann
|
| Materials
Needed |
|
 |
Cardmaker’s™
Citrus Creative Pack |
|
Cardmaker’s™ Birthday Clear
& Frosted Overlays |
|
Slide Mount Mania™ Jumbo Slide
Mounts |
|
blue brads |
|
white cardstock |
|
5”x6 1/2” blank white card
|
|
black pen |
|
black ink pad |
|
stapler |
|
X-acto® knife, cutting mat |
|
foam tape |
|
glue stick |
| |
|
| |
| Instructions
|
| For the Card Front: |
| 1. |
1) Place the card with the fold at the top, then trim
5/8” off the bottom of the card front. Cover the front of
the card with purple circles paper and ink the edges black. Cut
out the two zigzag border overlays and glue one even with the top
edge of the card front and the other along the bottom edge, trimming
the excess overlay even with the edges of the card. |
| 2. |
2) Cover two jumbo slide mounts, one with aqua mesh
paper and the other with lime squares paper, and ink the edges of
each. Mat each slide mount on white cardstock, trimming the mat
to 1/16” around the outside and inside edges of the slide
mount, then ink the outer edges of the mats. |
| 3. |
3) Cut out the “Delight” and “Cake
Ticket” overlays and attach them to the aqua slide mount with
staples, as shown. Cut out the “Enjoy your day and every day!”
overlay and staple it to the lime slide mount. Glue the slide mounts
to the card front at varying angles, placing the aqua slide mount
over the left half of the card front and the lime slide mount over
the right half. |
For the Card
Inside: |
| 1. |
1) Cut out the “Happy Birthday to You!”
striped border overlay and glue it even with the bottom edge of
the card inside (Hint: The border will also be visible when the
card is closed since you trimmed 5/8” off the bottom of the
card front in step 1). |
| 2. |
2) Cut two 2 1/8” squares, one out of aqua mesh
paper and one out of lime squares paper, and ink the edges of each
with black. Glue the lime square at an angle, centered on the inside
of the card, then use a black pen to add zigzag penwork around the
edges. Glue the aqua square at an angle over the left side of the
card, slightly overlapping the lime square, and add faux stitching
penwork around the edges of the aqua square. |
| 3. |
3) Cut out the purple circles tag and ink the edges.
Cut out the blue “Happy” and “Birthday”
word fragment overlays in one piece and secure the overlay across
the tag with a staple in each end. Add one blue brad to the top
of the tag, then use foam tape to secure the tag at an angle over
the right side of the inside of the card. |
| |
|
| Sponsor:
Hot Off the Press |
|