Remember when....they
were babies
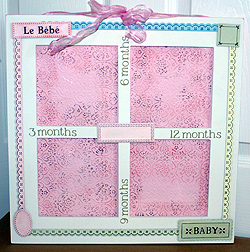
'Baby Gift Frame'
By Heather Lancaster
|
| Materials
Needed |

|
 |
Cuttlebug™die cutter
& Embosser system |
 |
Cuttlebug™ Embossing Folder -
Textile Texture 37-1153 |
 |
Cricut™ Cutting System |
 |
Cricut® Doodletype Alphabet Cartridge
29-0054 |
 |
Mon Petit Metal Border Strips - 28-2692
|
 |
Mon Petit Metal Plates - Girl - 28-2691
|
 |
Cardstock |
 |
Adhesive, Ribbon, Ink, pink paint |
 |
White Pre-Painted Frame 13-7551 |
| |
|
| |
| Instructions
|
| 1. |
1. Prepare frame by painting side edges with a coordinating
pink paint
and replacing the white ribbon that comes with the frame with pink.
|
| 2. |
2. Attach Mon Petit metal border strips onto each
side of the frame,
and fill the gaps and corners using coordinating Mon Petit metal
plates.
|
| 3. |
3. Use the Textile Texture embossing plate and your
Cuttlebug to create
pink embossed mats for inside of each window opening. These have
the
same look as the metal accessories! Lightly brush each embossed
piece
of cardstock with pink and black ink. Don't worry too much about
the
center of each mat as it will be hidden by a picture.
|
| 4. |
4. Use Cricut and the Doodletype Alphabet Cartridge
to cut 3,6, 9 and
12 month phrases for each window. To achieve type that is small
enough
to fit, chose the 'square' feature and cut each letter at 1".
Adhere to
outside of frame.
|
| 5. |
5. Your frame is now ready to give as a gift to a
new baby! As the baby
grows, the parents can place pictures into the frame, creating a
nice
keepsake as the baby grows!
|
| 6. |
6. To add an additional personal touch, cut and place
the babies name
on the center plaque!
|
| |
|
| Sponsor:
Provo Craft® and Novelty, Inc. |
|