2. Trim a sheet of darker gray paper down to 10.5”
x 12”.
3.
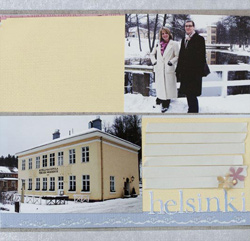
3. Adhere the dark gray paper approximately 3/4”
down from the top of the page.
4.
4. Trim a 6” x .5” section of pink paper
and adhere as shown.
5.
5. Punch a 12” strip of blue paper using the
Elegant Fountain embossing border punch. After punching the border,
adhere the blue paper slightly above the darker gray paper on the
bottom of the page.
6.
6. Trim 2 12” x 4” sections of yellow
paper and adhere to the page, leaving a slight portion of gray paper
showing between the two pieces of yellow.
7.
7. Adhere two 4x6 photos as well as a postcard or
3rd photo.
8.
8. Cut 6 small journaling strips. Slightly tear one
side of each strip for a distressed appearance.
9.
9. Adhere 5 of the strips to the page, but do not
adhere the 6th strip yet.
10.
10. Trim the rounded corners off of two flower embellishments,
cutting the tip of each petal at an angle to create snowflakes.
11.
11. Push the stick pin through the center of the yellow
snowflake, then attach the pin to the 6th journaling strip.
12.
12. Now you can adhere the 6th journaling strip to
the page, as well as the pink snowflake.
13.
13. To create the title simply adhere stickers to
page, then trace each letter with a white pen for a “snowy”
effect.