Epson Computer
Tip – Creating Faux Postage Stamps
(Using the Cookie Cutter Tool)
By Barbara Kotsos
 For
project ideas and more, visit www.epsoncreativezone.com For
project ideas and more, visit www.epsoncreativezone.com
|
| Thinking
“inside” the box has never been more clever! Small
blocks with photos or images, with or without text, cut to resemble
postage stamps are called “postoids”. These little
accents are perfect for scrapbook pages, journals, cards, and
so much more. Printed on self-adhesive papers, or simply glued
to any surface, postoids become stickers, letter seals, or great
accents for gifts and party favors.
If you have a printer and digital photos, you can
make unique and custom postoids featuring your friends, families
or even pets! The possibilities are endless when creating these.
Images can be scanned photos or art, digital photos, images from
CD, or even computer art. It is recommended, however, that due
to their small print size, a single subject or object will work
best as the featured focal point. |
|
| Here’s
how to make them: |
 |
Open PSE 5.0, click on Edit
& Enhance Photos |
|
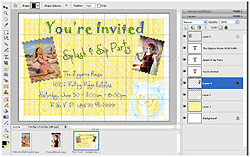
Open one or more images with which
to work.
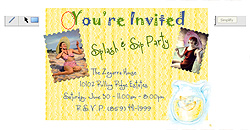
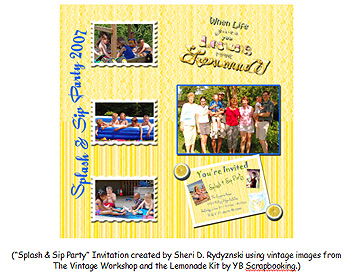
a. In this sample we’ll create postoids for a pool party invitation,
using cool vintage art from an image CD.
|
|
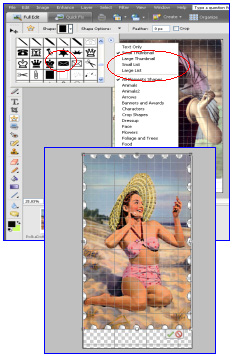
Click on the Cookie Cutter
Tool (Press Q)and make sure you select All Element
Shapes, instead of relying on the Default shape selection. |
|
Look for and click on the Stamp
1 shape. |
|
Holding the left-mouse key down, drag
the Stamp 1 shape over the image to be “cut” into the
stamp shape, and then release the mouse key. |
|
Click on the check mark to confirm
the cut. |
|
If you need to resize the image, do
so now. Click on Image > Resize and enter the
new measurements. A typical postage stamp size is approximately
¾” x 1”. Don’t feel restricted, create
whatever size you like! |
| |
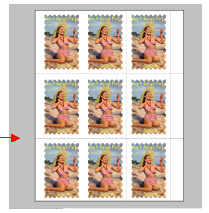
| There are several ways you can print your
postoids: You can insert them as digital embellishment,
in another file. |
|
Open the completed post card, or other project receiving
the postoid. |
|
Click on the Move Tool (Press V) and drag the
newly-created postoid to where you would like it positioned on your
post card, birth announcement, party invitation, etc.
Or, you can print a number of postoids onto a sheet of inkjet photo
paper, effectively making an entire sheet of these stickers. Cut
them out, and apply acid-free adhesive to the back of each, to stick
them to your desired surfaces. An easier option is to print them
onto special inkjet photo paper with a removable adhesive backing,
such as:
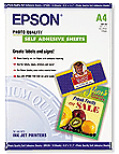 Epson Photo Quality Self-Adhesive Sheets,
part number S041106, available at www.Epson.com.
You would simply print, cut them out, and peel off the backing before
sticking. Epson Photo Quality Self-Adhesive Sheets,
part number S041106, available at www.Epson.com.
You would simply print, cut them out, and peel off the backing before
sticking.
|
| |
|
| To create 3-D paper sheets filled with postoid
stickers: |
|
|
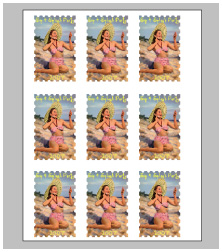
Create a New Blank File by clicking on File >
New > Blank File. Size the file to 8 ½” x 11”
and select a white background. |
|
Click on the Move Tool (Press V) and drag the newly cut postoid(s)
to the New Blank File (which will ultimately become your printable
sticker sheet full of multiple or single images). Drag the postoid
to where you would like it positioned.
a. If you are filling a sheet with multiple individual images, using
the Move Tool, drag and drop each image into position.
b. If you are creating a full printable sheet, filled with the same
image, duplicate the original layer and drag the copy into place.
Duplicate the original layer, as many times as needed to fill the
sheet. For cutting ease, draw in cut lines, using the Line Tool.
1 . To draw cut lines, click on the Rectangle Tool (Press U) and
in the tool’s menu, click on Line Tool.
|
| |
|
Barbara Kotsos
| Sponsor: Epson
America, Inc. |
|