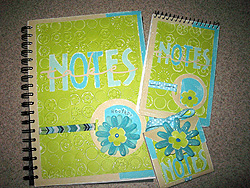
SMALL SMALLER SMALLEST NOTEBOOKS
By Heather Lancaster
For more information visit: 
|
| Materials
Needed |

|
 |
Cricut™ Cutting
System |
 |
Cricut™ Opposites Attract Cartridge
|
 |
Cricut™ Walk in my Garden Cartridge |
 |
Cricut™ Fabulous Finds Cartridge
|
 |
Cricut™ Rainbow and Earth tones
paper pads |
 |
Cuttlebug™ Cutting and Embossing
System |
 |
Cuttlebug™ Bloom Dots embossing
folder |
 |
Provo Craft Half-a-bitties alphabet
stickers |
 |
Blank notebook, memo pad and sticky
notes |
 |
Adhesive |
 |
Sandpaper |
 |
Silk Flowers |
 |
Ribbon |
 |
Brads |
| |
| Instructions For NOTEBOOK |
| 1. |
Cut background paper to notebook size, sand lightly
so that white core of paper shows through and adhere in place |
| 2. |
Cut Green Cricut paper to fit in center of notebook.
Emboss using Cuttlebug Bloom Dots embossing folder. Sand as above
and adhere in place. |
| 3. |
Using Cricut Opposites Attract cartridge, cut NOTES
in 2.5" size and 'take' in 1.5" size. Sand and adhere
in place. |
| 4. |
Using Cricut Fabulous Finds cartridge, cut circular
tag in 3" size and then using 'Inserts' feature, cut background
of tag in same size. Sand and attach ribbon, then attach to notebook
cover. |
| 5. |
Cut one 1" 'bloom' flower from Cricut Walk in
my Garden cartridge and layer on top of silk flower petals. Secure
with a brad and then adhere in place on notebook. |
| 6. |
If desired, personalize with sticker letters. |
| |
|
Instructions For NOTE
PAD |
| |
Follow instructions 1 through 6 as above, changing
Cricut Cut sizes as follows: |
 |
NOTES - 1.5" |
 |
take - 1" |
 |
Tag - 2" |
 |
flower - 1" |
| |
Instructions
For STICKY NOTES |
| 1. |
Using Cricut Fabulous Finds Cartridge, select BLACKOUT
feature and cut Flower Album (flpalbm3) at 3". (beige paper)
Sand edges. |
| 2. |
Cut teal strip of teal paper to fit on top from on
album. Sand lightly and adhere in place |
| 3. |
Wrap a piece of ribbon around album so that it will
tie at top of album cover. The ribbon will go underneath the flower
on the front cover. |
| 4. |
Cut Green Cricut paper to fit in center of album cover.
Emboss using Cuttlebug Bloom Dots embossing folder. Sand as above
and adhere in place. |
| 5. |
Using Cricut Opposites Attract cartridge, cut NOTES
in 1 1/4" size. Sand and adhere in place. |
| 6. |
Cut one 1" 'bloom' flower from Cricut Walk in
my Garden cartridge and layer on top of silk flower petals. Secure
with a brad and then adhere in place on top of existing album flower. |
| 7. |
If desired, personalize with sticker letters. |
| |
|

Heather Lancaster
Sponsor: Provo Craft® and Novelty
Inc. |