Epson Computer
Tip - Color My World
(Using Colorization, Saturation and Posterizing Effects)
By Barbara Kotsos
 For
project ideas and more, visit www.epsoncreativezone.com For
project ideas and more, visit www.epsoncreativezone.com
|
| Do
you dream in color? Create dream-like designs that will add vibrancy
and life to otherwise moderate pages and projects. Colors convey
life and trigger memories – pump up the color of your images
with the click of a mouse |
| 1. |
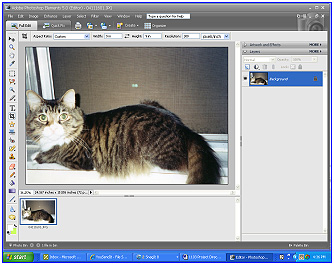
Choose a favorite photo.
Photos of people or of a individual subject tend to work best with
this technique.
|
| 2. |
Open Adobe PSE 5.0 and go to File >
Open and select your picture with which to work. |
| 3. |
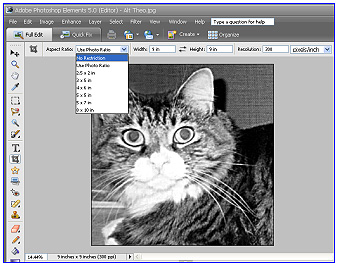
Go to Image > Mode > Grayscale.
Instantly, all color information will be removed from your photo.
If you want to tweak the contrast of the photo for a more dramatic
effect, now is the time to do so. Click on Enhance > Adjust Lighting
and select Brightness and Contrast. Move the Contrast slider bar
to amp up the contrast, if desired.
|
| 4. |
Select the Crop Tool (Press C) and
crop the image. For this example we’ll crop to a size of 9”x9;”
confirm the action. If you’ve already purchased frames for
your wall art, make sure the crop and final print size will fit.
|
| 5. |
Next, open four blank files with the
specifications of :
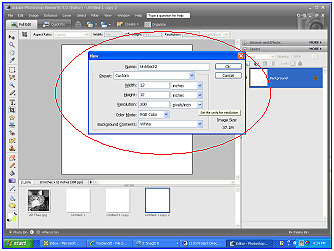
a. Size: 12”x12”
b. DPI: 300
c. Background: White
We’ll use these larger blank files, as our “canvas”
in creating our wall art.
|
| 6. |
Go back to your gray scale image. Click
on Image > Mode > RGB. |
| 7. |
To begin applying the colorization
effect, click on Enhance > Adjust Color > Hue/Saturation (Control
Key + U). |
| 8. |
Check the Colorize Box and move the
Hue Slider to the desired color for your first print. Adjust the
Saturation, using the Saturation Slider, as desired.
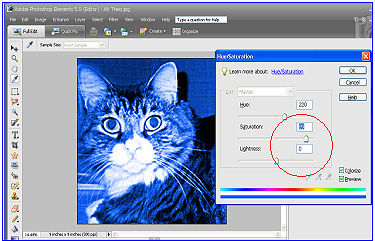
a. In this sample, we will choose Blue
|
| 9. |
Once satisfied with the Hue and Saturation
levels, click OK. |
| 10. |
At this point in time, it’s important
to save this newly colorized image. Click on File > Save As and
choose a new name for this file, so you don’t save over your
original image. |
| 11. |
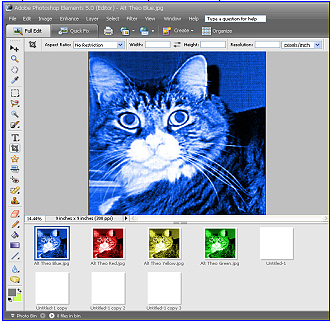
One image in blue is now complete. Repeat
the colorization process (steps 7, 8 and 9) and create three more
images in different colors. Make sure you save the additional images,
with new file names, so you don’t save over your original
image.
|
| 12. |
Now you should have four white 12x12
files and four colorized 9x9 image files. |
| 13. |
Next we will create two mirror images
by clicking on one of the four colorized images and then clicking
on Image > Rotate > Flip Horizontal

a. Using a mirror image will create a more artistic and dramatic
effect when the images are displayed in a group.
b. Repeat this step with another colorized image. You should now
have two colorized images facing left and two facing right.
|
| 14. |
Choose the Move Tool (Press V) and
drag each one of the newly colorized images to the top of the white
12”x12” sheets (one per sheet), centering the image
in the middle, so there is a generous 3” white border.
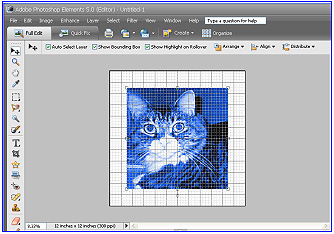
a. If you need help centering the image in the middle of the sheet,
turn on the grid view by clicking on View > Grid.
|
| 15. |
Save the newly created, layered files.
Print each individual file and insert into frames. |
If monochromatic
isn’t your style, trying experimenting with touches of extreme
color, like Gabe Grunbaum did in these cool examples: |
| |
|
To create
a funky posterized effect, choose a favorite photo. Photos of
people or a single subject work best with this technique. |
| 1. |
In Adobe PSE 5.0, open your image and
crop it to the desired size. If you’ve already purchased a
wall frame, make sure the final print will fit the frame. |
| 2. |
Go to Image > Mode > RGB. If you
want to tweak the contrast of the photo for a more dramatic effect,
now is the time to do so. Click on Enhance > Adjust Lighting
and select Brightness and Contrast. Move the Contrast slider bar
to amp up the contrast, if desired.
|
| 3. |
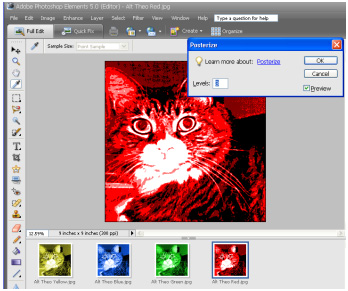
Next, click on Filter > Adjustments
> Posterize. Start experimenting with your Levels at about 4.
The lower the level, the more intense the effect. |
| 4. |
Go to File > Save As and save your
photo with a different name, so you don’t save over your original. |
| 5. |
Print your image. |
| |
|