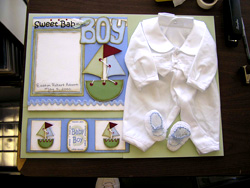
Pre-made 12x12 “Sweet Baby Boy”
page layout by Just Jinger Designs
Aloe Vera Bazzill cardstock
Blue Bell Bazzill cardstock
White Bazzill cardstock
Van Dyke Brown ink
Ink sponge
Glue dots
Foam squares
Pins
Sakura pen black, Microperm 05 (This
pen is perfect for writing on photos.)
Your child’s christening gown.
Instructions
1.
Take 4 sheets of the Aloe Vera cardstock and glue
to the back of the shadow box panel. That will be the background
to place your gown and layout on. I used glue dots to get a firm
secure hold.
2.
Using the first page of your pre-made baby boy layout,
put the picture of your child on the photo mount.
3.
On the back of the 12x12 page mentioned above, adhere
foam pop-dots. Glue you page onto the top right hand corner of the
panel from the shadow box.
4.
Next cut a 4x12 inch strip of Blue Bell cardstock.
Ink around the edges with the Van Dyke Brown.
5.
Cut two white squares of cardstock measuring 3 ½
x 3 ½. Ink all of those edges. Adhere to the blue strip as
shown.
Take the second page of the “Sweet Baby Boy” pre-made
layout, and peel off the two small boats. Using small foam squares,
adhere them to the back of the boats, and glue into the center of
your white blocks of cardstock.
6.
Peel off the baby boy graphic from the second page
of your “Sweet Baby Boy” layout.
7.
Glue the baby boy graphic in the center of you 4x12
inch blue strip. Next add the white squares onto each side of the
graphic. Adhere this strip using foam squares, directly under the
layout.
8.
Using pushpins, secure your child’s Christening
gown into place.
9.
Using the Sakura pen, write on the bottom of your child’s
photo their full name and birthdate.