ABC Book For Children
By Jinger Adams
For more information visit: 
|
| Materials
Needed |
|
 |
Thirteen 8x8 chipboard squares with
three 1/8 inch holes punched on one side. |
|
Three silver book rings 3-inches round |
|
Red, orange, blue and green ribbon 1-inch
or bigger |
|
Orange dot patterned paper |
|
Just Jinger Pre-made embellishments |
|
Blue Bazzill cardstock |
|
White Bazzill cardstock |
|
Crimson Bazzill cardstock |
|
Leapfrog Bazzill cardstock |
|
Mexican Poppy Bazzill cardstock |
|
Festive Bazzill cardstock |
|
Black Bazzill cardstock |
|
Alphabet letters cut 3 ½ inches
from the above mentioned colors |
|
Foam square pop dots |
|
Glue dots |
|
Paper trimmer |
|
Scissors |
|
Sakura Pen, Micron black 08 |
|
Van Dyke Brown ink pad |
|
Black ink pad |
|
Sponge |
|
1/8 – inch hole punch |
|
White acrylic paint |
|
1-inch foam brush |
|
Small red, orange, and blue buttons |
|
Star punch |
| |
|
| Instructions |
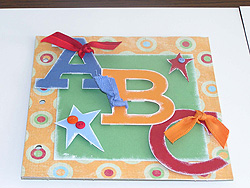
Cover Page: |
| 1. |
Cut the orange circle paper to 8x8 inches. Adhere
it to the 8x8 chipboard using glue dots. Take you hole puncher,
turn over the chipboard so that you can see where the holes are
punched. Punch you holes in line with the holes on the chipboard. |
| 2. |
Take your big 3 ½ inch letters A B C and lightly
paint the edges white. While these are drying cut a piece of leapfrog
green to a 6x6- inch square. Glue that in the middle of the orange
dot paper. |
| 3. |
Put foam Squares onto the back of your big A B C letters.
Place them going down the book, in a diagonal, as shown. Wrap red
ribbon around the “A” Blue ribbon around the “B”
and orange ribbon around the “C”. |
| 4. |
Next add the heart punch-outs, painting white around
the edges. Adhere with the foam dots also. Add the buttons onto
the top. |
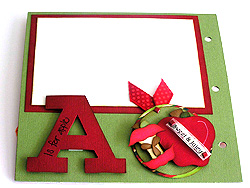
Inside Pages: |
Tip:
Almost all of the photo mounts are all the same size. The outer
mount color is 5x7 inches and the inside white color is 4 ½
x 6 ½ inches. |
A is for Apple: |
| 1. |
Cut leapfrog green to 8x8 inches. Adhere to the chipboard. Make
sure to punch out your holes for the rings to slip through.
|
| 2. |
Cut your crimson red cardstock to 5x7 inches. Ink
all the edges with Van Dyke brown ink. |
| 3. |
Cut a piece of white cardstock 4 ½ x 6 ½
inches. Ink all of its edges. Adhere to the red mount. |
| 4. |
Adhere the mount to the top middle of the 8x8 page. |
| 5. |
On your “A” write the phrase “A
is for apple” with your Sakura pen.
|
| 6. |
Using foam dots, adhere your “A” onto
the bottom right of the page. |
| 7. |
Next adhere your apple tag using glue dots. (Tip:
I don’t use foam dots on the already made tags. They usually
already have pieces on them that are popped up.) |
| 8. |
Continue all your next pages in the exact same way,
just using different colors of cardstock that accent the embellishments
for that letter. |
| 9. |
After all the pages are designed put the rings into
the holes of the chipboard. |
| 10. |
Finish off by tying ribbon around all of the rings. |
| |
|

Jinger Adams
Sponsor: Wilton Industries/ Just
Jinger Designs |