Printing More Than One Photo per Page
Step-by-step Instructions: One software program that allows you to print multiple photos (in any size) on one page is Photoshop Elements.
Open Photos:
To begin, open your digital photos in Photoshop Elements by selecting File | Open. The Open dialog box allows you to search your computer for the digital photos you wish to print. You can even open photos from a CD using this dialog box.
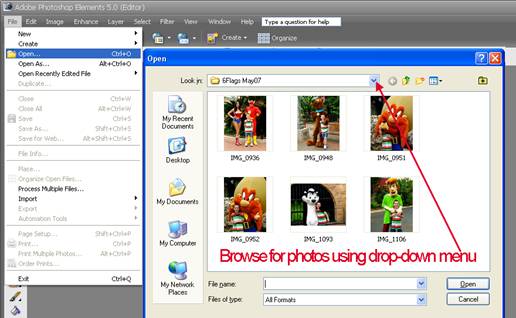
Select photos by holding the Ctrl key as you click on the photos you want to open. Click the Open button to bring the photos into Photoshop Elements. The photos will be visible in the photo bin at the bottom of the screen.
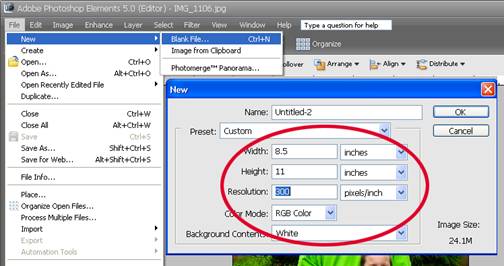
Create a new document:
Next, create a new document in the size you want to print. In this case, we are printing on an 8.5 by 11-inch paper. Select File | New | Blank File.
Type the paper dimensions in the New dialog box. Select 300 pixels/inch for good print quality. Also select RGB color and a background color of white. Click OK to create the new file .
Place photos on the new document:
 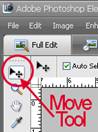
Select the Move Tool.
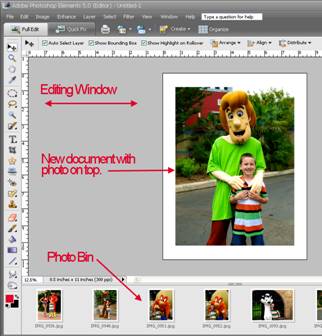
Click and drag one of the photos from the photo bin up onto the new document in the editing screen.
The new document will appear in the large editing screen with the photo on top.
Resizing Photos:
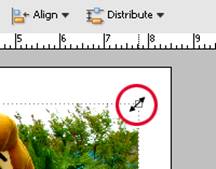
At this point, your photo may be larger than you want to print it. To resize the photo, simply move your cursor to one of the four corners of the photo. You will notice that your cursor changes to a diagonal arrow when you hover over the photo corner. Drag this arrow toward the center of the photo to make the
photo smaller. (Note: dragging the cursor away from the center of the photo makes the photo larger.)
Photoshop is equipped with rulers across the top and down the side of the editing window. You can use these handy rulers to determine the new size of the photo. If your ruler is not visible, select View from the Menu Bar. Make sure that Rulers is checked.
Once your photo is resized, you can move it around the page by placing the cursor in the center of the photo and dragging it into place.
Repeat the dragging and resizing process until you have enough photos grouped on the page.
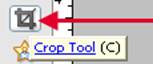
Another way to resize photos for printing is to select the Crop Tool,
then click on an image in your photo bin. Your cursor will take the shape of the crop tool, letting you know that the tool is selected.
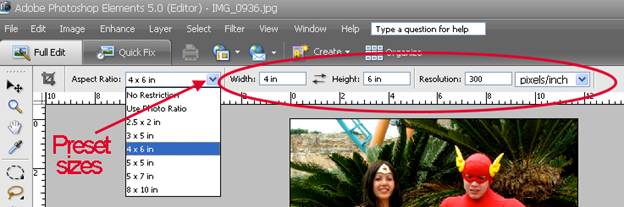
Select the desired size from the Options Bar above the editing window. You can either select a preset size from the drop-down menu, or you can type a size of your liking in the boxes to the right of the presets. This is handy if you need to crop a photo to fit into a frame, slide mount, photo jewelry item, or other project of unusual size.
Note: a Resolution of 300 pixels/inch is recommended for good print quality.

After selecting the size you desire, simply click and drag the cursor around your photo to crop it.
Note: You can crop the entire photo or just select a portion of the photo using this method. This is a good way to crop away unwanted portions of your photo.
Finally, click the green check mark to confirm the crop.
Now your resized photo can be dragged down onto your new document by selecting the Move Tool, clicking and dragging.
Rotating Photos:
As you are arranging photos on the page, you may need to turn one on its side to make the most of the space you have to work with.
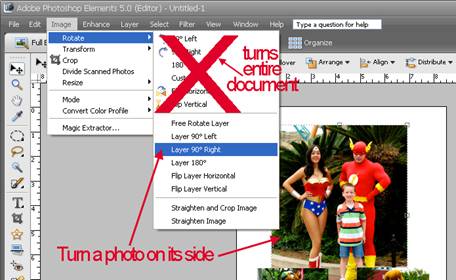 To rotate a photo on its side, first use the Move Tool to select the photo (while it is on top of the document.) Next, select Image | Rotate | Layer 90◦. To rotate a photo on its side, first use the Move Tool to select the photo (while it is on top of the document.) Next, select Image | Rotate | Layer 90◦.
Be careful to select the Layer using the commands in the middle of the box. The commands at the top of the box will rotate your entire document, not just the photo.
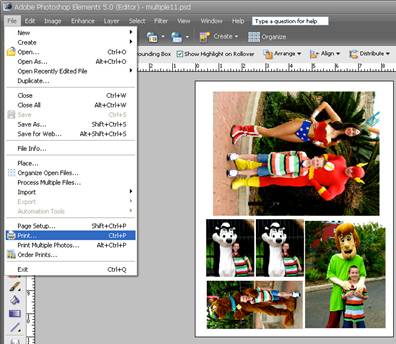
Once you have filled your page with photos, printing them is as easy as selecting File | Print from the Menu Bar.
Tip: Using your completed sheet, printing several copies of your photos for friends and family is a snap!
Using these instructions, you will be able to print your digital photos right from home, at whatever size you like - even the most unusual, custom size!
You'll be able to get the most from your printing supplies while printing photos that can last up to 200 years in dark album storage!
Other Ways Use Your Sheet of Photos:
- Slip a printed sheet of photos into a photo album for quick album pages
- Embellish a printed sheet of photos for a quick scrapbook page
- Print an extra sheet to send to friends or family
- Offsite photo archiving: print an extra sheet to store somewhere away from your home in case of a disaster.
|