Felt and Flocked Accents
Cute Layout
Designed by Erin Clarkson

- Add an 8½ x8" piece of patterned paper on an 8½ x 11" sheet of cardstock.
- Adhere a 4 ½x7 ½" photo as shown. Print journaling on white cardstock and attach to layout. Add felt letters for title, rub-on stitches to the top seam and rub-on letters to the bottom right corner.
- Punch five small holes across the layout just below the patterned paper. Layer two sizes of felt flowers and attach them to the layout with a brad. Repeat until all of the holes are covered.
Port O'Connor Layout
Designed by Erin Clarkson
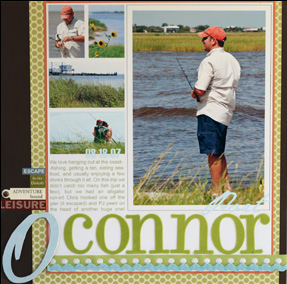
- Attach a 7 3/4x 9" piece of patterned paper to a 9x9" piece of cardstock. This designer arranged her photos in a photo-editing program, added journaling and part of her title, and printed all of the images together, then matted them on a piece of orange cardstock. You could add the photos and journaling individually.
- Add rickrack and ribbon to the bottom of the photo grouping, then add chipboard and felt stickers to complete the title.
- Embellish with word stickers and a brad.
Personal Style Layout
Designed by Erin Clarkson
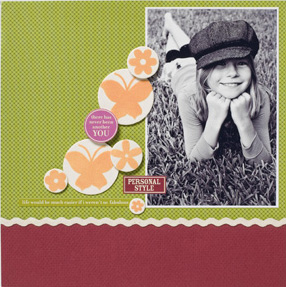
- Attach a 9x2" piece of cardstock to the bottom of a 9x9" piece of patterned paper. Position a 4 1/4x6 ¼ photo as shown and add word stickers.
- Apply adhesive rub-on images to several chipboard circles, then cover images in felt.
- Arrange circles as shown, adhering a few of them with adhesive foam to give them dimension.
- Finish it off with a circle sticker adhered with adhesive foam
Razor Layout
Designed by Erin Clarkson
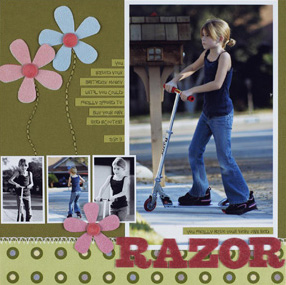
- Adhere a 1 1/2x9" piece of flocked patterned paper at the bottom of a 9x9" sheet of cardstock. Apply rub-on stitches to the seam. Attach a 4 1/2x7 ½" photo and three 1 1/4x3" prints (all matted on white) as shown.
- Print journaling, trim it into strips and attach on the left edge and bottom of the large photo.
- Stitch green "stems" as shown, then apply felt flowers (with felt brads in the middle) and title to complete the project.
Season’s Greetings Card
Designed by Erin Clarkson
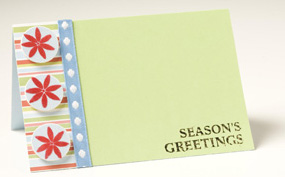
- Add a 1½x3” piece of striped patterned paper to the right edge of a 4x6” card base.
- Adhere a polka-dot ribbon to the seam created by the patterned paper.
- Cover three chipboard circles in blue paper. Apply an adhesive rub-on from a do-it-yourself flocking and foiling kit to each circle. Lay a sheet of flocking atop on of the adhesive rub-ons and burnish before gently pulling the sheet away.
- Repeat for each rub-on.
- Follow the same process for sentiment, but instead of flocking, use a sheet of foil.
|