HeartFelt Scrapbook Embellishments

Materials Needed:
Computer with Adobe Photoshop Elements
Epson Scanner
Introduction:
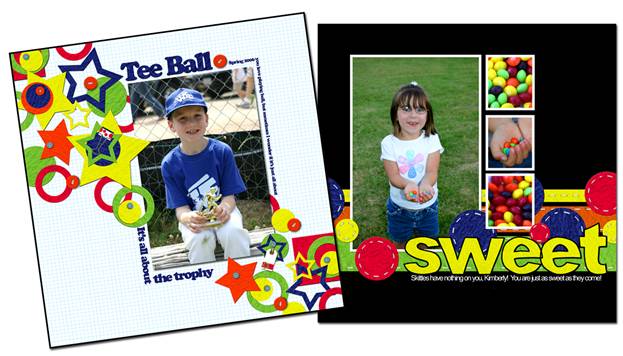
 Felt embellishments are all the rage in both traditional and digital scrapbooking. The distinctive texture of felt gives scrapbook pages interest and dimension. Felt is easy to work with, both traditionally and digitally. You'll be amazed how easily you can create your own felt embellishments which can be reused over and over again. Felt embellishments are all the rage in both traditional and digital scrapbooking. The distinctive texture of felt gives scrapbook pages interest and dimension. Felt is easy to work with, both traditionally and digitally. You'll be amazed how easily you can create your own felt embellishments which can be reused over and over again.
Scanning Felt Sheets:
Begin building your personal felt embellishment collection by scanning sheets of colored felt with a photo scanner. For best results, avoid very dark or very light colors (black and white.) It is difficult to capture the texture details on these colors.
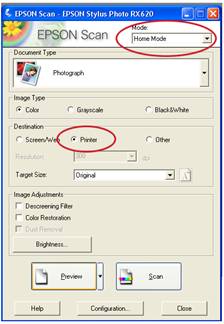
Scan your felt sheets in Home Mode with Printer as the Destination. This will give your felt creations a good print quality.
Preview the scan to make any adjustments to the way it arranged on the scanner bed. Make sure that your scanner bed is clean. A microfiber lens cloth can be used to clean the glass, if necessary.
When your preview is satisfactory, click Scan.
Creating Felt Shapes:
Open your felt sheet in a graphics editing program such as Photoshop Elements by selecting File | Open and browsing your computer for the scanned felt image.
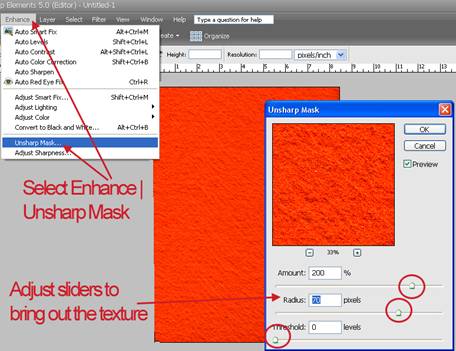
You can enhance the visual texture of your scan by selecting Enhance | Unsharp Mask. Adjust the sliders to bring out the texture of your felt.
 Toggle the Preview button to view your changes. When you are satisfied, click OK. Toggle the Preview button to view your changes. When you are satisfied, click OK.
To cut the felt sheet into an embellishment, click the Cookie Cutter Tool from the toolbar on the left side of the screen.

Selecting the Cookie Cutter tool activates a series of options in the Options Bar across the top of the page.
Click the arrow to activate the drop-down menu labeled Shape.
Set the Feather to 0 px for a crisp, clean cut.
Scroll down to view the many custom shapes available in Photoshop Elements - stars, leaves, and flowers are popular felt shapes. Even felt tape can be created by selecting the rectangle Custom Shape. Click to select the shape you would like to cut. Move the cursor over your felt sheet. Hold Shift while you click and drag out the shape. Holding Shift ensures that your shape remains proportional. When your shape is as large as you need, release the mouse click before releasing the Shift key.

Click the green check mark below your shape to confirm the cut.
Your shape is now cut out and mounted on a transparent background which is indicated by the grey and white checkerboard pattern.
To give the edge of your felt shape authenticity, give it a small beveled edge.
Switch to the Move Tool  then locate the Palette Bin at the right side of your screen. then locate the Palette Bin at the right side of your screen.
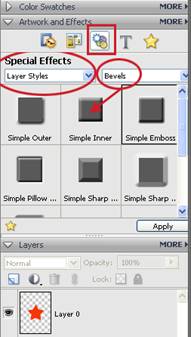
From the Artwork and Effects Palette, select the third button (labeled Apply Effects, Filters and Layer Styles when you hover over it.)
Choose Layer Styles from the drop-down menu on the left side of the Special Effects palette. Activate Bevels from the drop-down menu on the right side of the Special Effects palette.
Double click on Simple Inner.
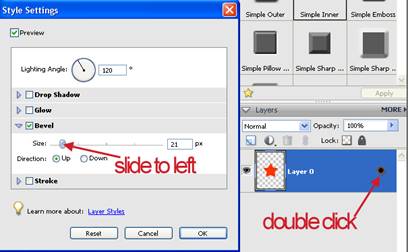 Photoshop defaults to a large bevel. To finesse it, double click the sun in the Layers Palette. This brings up the Style Settings dialog box. Photoshop defaults to a large bevel. To finesse it, double click the sun in the Layers Palette. This brings up the Style Settings dialog box.
Slide the Bevel size slider to the left until a more realistic bevel is achieved. You will be able to preview your progress by watching the edge of your shape as you slide.
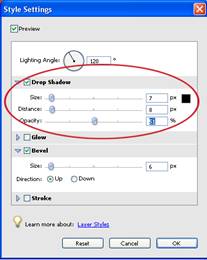
Adding a small Drop Shadow within this box will also help give your felt shape a more authentic look. Simply check the Drop Shadow box, then adjust the sliders to the left until the shadow is to your liking.
Saving Your Embellishment:
One of the best things about creating your own digital embellishments is the ability to use them over and over again. To save the felt "sticker" with a transparent background, you'll need to save it as a PNG file.
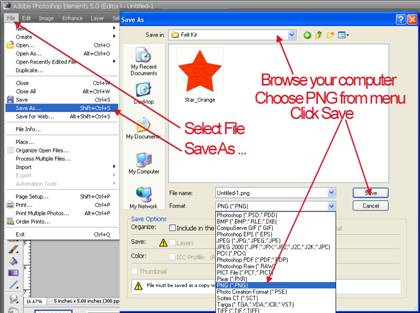
Click File | Save As . . . to activate the Save As dialog box.
Determine where the image will be stored by browsing your computer from the drop-down menu at the top of the box.
Name your file, then select PNG as the format. Click Save to complete the process.
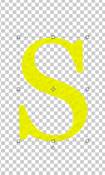
Felt Letters:
Another fun way to use your scanned felt sheets is to create felt title letters and monograms.
First, select the Text Tool from the tool bar on the left.
From the Options bar, select the third T, the Horizontal Type Mask Tool.
Select any font installed on your system. Choose a style and a size. You will want to make the monograms quite large - 200 or 300.
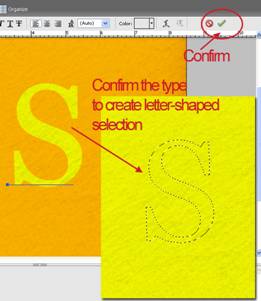
Position your cursor over the felt sheet. Left-click once. Do not be alarmed - the software will cover your felt sheet with a red overlay. Type the desired letter, then commit the edit by checking the green check mark on the Options Bar.
This creates a selection (marching ants) in your letter shape.
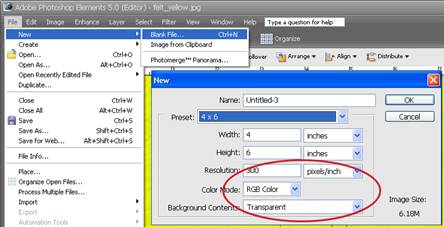
You'll need to create a background for your new letter. Select File | New | Blank File. In the New Dialog box, create a document with a Resolution of 300 pixels/inch, with an RGB Color Mode and Transparent Background.
Activate the Move Tool. Click on your monogram felt sheet in the Photo Bin at the bottom of your screen. Dragging from the center of your selected letter, drag the letter down onto the new transparent document.
 Give your monogram letter a small bevel and drop shadow to finish it. Give your monogram letter a small bevel and drop shadow to finish it.
 Embellishing the Felt Shapes: Embellishing the Felt Shapes:
Have fun with your felt shapes and letters. Embellish them with buttons, stitching, ribbons, glitter, beads, clips, or any other digital embellishments you have purchased or created. Get as creative as you like with your felt, knowing that your scanned embellishment will always lay flat in your album and can be used over and over again.
Give your next project a heartfelt touch with your own trendy felt creations.
|