If you have heritage photos or photos that have been stored in magnetic albums for a few years, chances are you have a stack of photos that have turned an odd shade of red or orange. Many photos taken in the 1970s are experiencing a color shift as they age. Now is the time to "rescue" these photos and repair the damage that light and time have caused before it is too late.
There are other reasons you may need to correct a color cast in a photograph. Perhaps you shot a series of photos with an incorrect white balance setting. You may notice a strange blue cast or a golden cast in your pictures. Like heritage photos, these color casts can be corrected and your photos can be saved.
There are two ways to correct or eliminate strange color shifts in photos. One easy way is to scan your photos using a photo scanner with color correction. The other method uses graphics editing software.
To save photos with a color shift due to age and acidity in adhesives, first try using a scanner with One Touch Color Restoration technology.
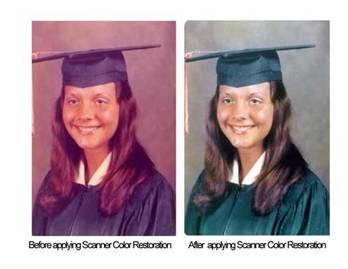 Scan in Home Mode and check the Color Restoration option to correct and restore your photos in one easy step. Scan in Home Mode and check the Color Restoration option to correct and restore your photos in one easy step.
Correcting a Color Cast with Photoshop Elements:
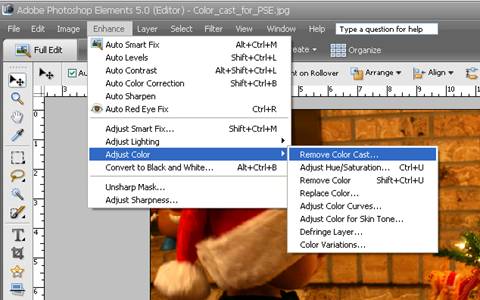 Photoshop Elements 5.0 has a feature which makes quick work of restoring correct color to photos. To access this feature, open a photo by selecting File | Open from the Menu Bar. Enhance the photo by selecting Enhance | Adjust Color | Remove Color Cast from the Menu Bar. Photoshop Elements 5.0 has a feature which makes quick work of restoring correct color to photos. To access this feature, open a photo by selecting File | Open from the Menu Bar. Enhance the photo by selecting Enhance | Adjust Color | Remove Color Cast from the Menu Bar.
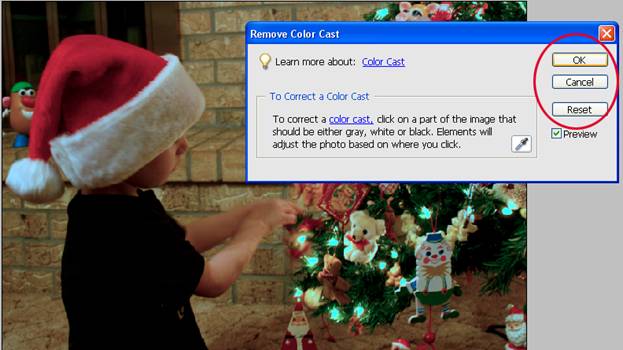
Your cursor will become an eyedropper. To correct the color cast in your photo, click on a part of the image that should be white, black or gray. White or black areas are generally best for this function. If you are unhappy with the results, click Reset and try again using a different section of the photo. When you are satisfied with the results, click OK.
In just a few easy steps, your photos can be restored to a more natural color and damaged photos can be saved for future generations to enjoy. |