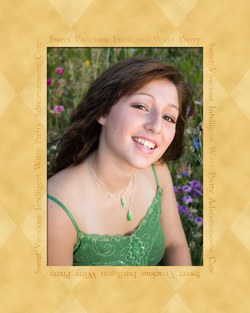
Create the mat paper:
- Create a new document the size you want your mat to be, such as 5 x 7 or 8 x 10.
- Click on the Foreground and Background Color Chips and select two matching colors, one slightly darker than the other.
- Choose Filter > Render > Clouds. This will fill your document with the two colors you chose in a cloud pattern.
- Get the Custom Shape tool, open the Shape Picker Menu in the Options Bar, and double click on the diamond shape called Tile 4. If you don't see this shape, click on the right facing triangle at the top, right of the Shape Picker to open the flyout menu. Choose "All" to load all the shapes.
- Click and drag out an outline from the top, left corner of your document to the bottom, right corner. When you let go of the mouse, the shape will fill with the Foreground color.
- Change the Blend Mode at the top of the Layers palette from Normal to Multiply.
- Move the Opacity slider at the top of the Layers palette to the left to around 40%
- Open the Layers palette flyout menu and choose Flatten Image.
Add the photo:
- Open the photo you want to use (File > Open).
- Get the Move tool. Press the Shift key and click and drag the photo onto your mat. (Pressing Shift will center your photo on the mat.)
- If you need to resize your photo, make sure "Show Bounding Box" is checked in the Options Bar. Click and drag from a corner handle to resize the photo.
- Click on the check mark next to the bounding box to accept the changes.
Add Personalized Type
- Use the Type tool to add some type around each side of the photo.
Hint: To rotate a type layer, choose Image > Rotate > and choose one of the options in the bottom section of the drop down menu. (The bottom section rotates just a single layer. The top section rotates the entire image.)
- When you have four type layers, one on each side of the photo, select all the type layers in the Layers palette by clicking on the first one and Shift clicking on the last one.
- Open the Layers palette flyout menu and choose "Merge Layers."
- Press the Ctrl key (Mac: Cmd key) and click on the thumbnail of the merged type layer to get a selection outline.
- Hide the outline by pressing Ctrl H (Mac: Cmd H).
- Click on the mat layer (the bottom layer) in the Layers palette to select it.
- Get the Burn tool. Set the Range to Midtones and the Exposure to around 40% in the Options Bar. Drag the Burn tool brush over all four sides of the mat right next to the photo and the type will begin to appear. The more you brush over it, the darker it becomes. You can make some of the type darker than the rest to make it look artistic.
- When you're satisfied with the look, press Ctrl H (Mac: Cmd H) to reveal the selection outline, and choose Select > Deselect to get rid of the outline.
Print it out, and you're ready to place the photo and mat in a standard photo frame and hang it on your wall!