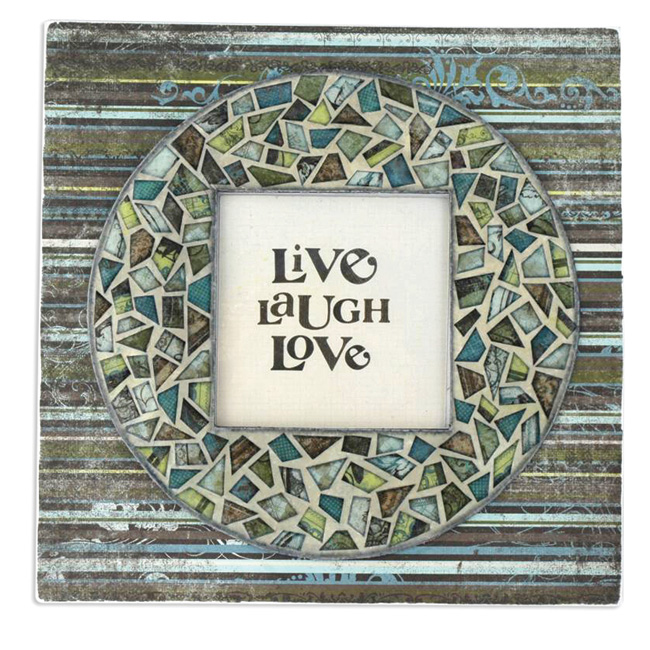
1. Place 12”x12” piece of Vineyard over frame and rub with finger or stylus to mark the center square. Remove paper and trim out center square. Apply gluestick to backside of entire piece and press firmly onto front of frame. Distress and ink outside edge.
2. Trace a 10” circle onto the 12” square piece of chipboard and cut out. Cut 4 ¾” square from the center of the chipboard circle. Apply gluestick to entire surface of chipboard and adhere to the wrong side of a sheet of Blanc. Using xacto knife, trim away excess and center of frame. Distress and ink all edges.
3. To create the mosaic frame:
a. Cut each 6x6 patterned paper in half; set aside one of the halves. You should have 6 different 3”x6” patterns. With scissors, begin chopping up each piece into random shapes, creating a pile for each pattern. Make pieces various sizes. Ink all edges.
b. Begin selecting random pieces from each pile, apply gluestick to back and position around circle chipboard frame. As you glue each piece on the frame, leave a bit of “relief” space in between each to create a mosaic effect. Trim pieces to fit, as needed. Rub each piece with your finger to ensure that all edges are glued down.
c. Apply Versamark pad across entire surface of round frame, pressing firmly to ensure that Versamark gets into the crevices in between the random pieces of paper. Apply UTEE and heat with heat gun. Be careful not to get the gun too close to the frame to avoid the pieces of paper from lifting. Repeat the Versamark/UTEE process 3-5 more times, until you have achieved a smooth, glossy surface. Set aside to harden.
[Note: as an alternative, place the round frame in a freezer for 15 minutes; remove and bend in random directions until the UTEE cracks, giving the whole frame a fractured appearance.]
4. Apply adhesive to the back of the round frame and adhere to 12” frame, centering the opening on the round frame over the opening on the 12”frame.
5. Cover frame insert (the one that came with the frame) with Blanc. Using dark brown letter stickers, spell the words Live-Laugh-Love as shown in photo. Place in wood frame opening and secure. (Alternatively, you can place your favorite photo in the frame.) |