-
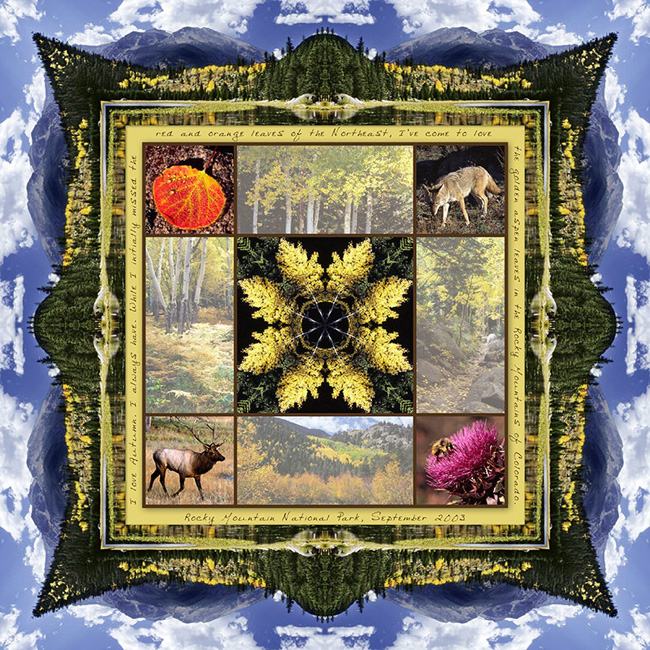
Open the landscape photo in Kaleidoscope Kreator 2.0 (File>Open Image). Click on the wedge button in the toolbar to choose the FF Square 60 (08) template shape. Move the photo around in the workspace to create a kaleidoscope frame to your liking. (Remember you can flip the photo horizontally if needed to fit better in the template shape.)
-
Save the kaleidoscope frame to a file (File>Save Kaleidoscope). Specify a size of 12” and a resolution of 300 pixels/inch. Click OK. Next choose a filename and file type. (If you choose JPEG, you will be prompted to enter a quality level; choose level 10 for the best quality.) Click OK. Remember where you saved the file!
-
Still in Kaleidoscope Kreator 2.0, open another photo that you want to use for the center kaleidoscope (File>Open Image). Click on the wedge button in the toolbar to choose one of the square template shapes (but not a frame), e.g. Square (08). Move the photo around in the workspace to create a kaleidoscope frame to your liking.
-
Save the kaleidoscope frame to a file (File>Save Kaleidoscope). Specify a size of 3.25” and a resolution of 300 pixels/inch. Click OK. Next choose a filename and file type. Click OK.
-
In Photoshop Elements 6, File>Open the kaleidoscope frame that you saved from Kaleidoscope Kreator.
-
Set the gridlines so that you’ll easily be able to center additional objects on your page. From the menu, Edit>Preferences>Grid. Set the “Gridline every” value to 50 and change the units to percent. Set the Subdivisions to 1 and click OK. If you can’t see the gridlines, go to View>Grid in the menu.
-
Choose the Rectangular Marquee Tool and change the Mode to “Fixed Size” in the Options bar. Then set both the Width and Height to “7.375 in”. (You must type in the letters “in” along with the numbers to specify inches.) Click anywhere in the image to create the square selection. Then click and drag inside the square of marching ants and move the selection so that it is centered in the image. It should “snap” to the guidelines once it is close to the center.
-
-
Choose the Rectangular Marquee Tool and make sure the Mode is still set to “Fixed Size” in the Options bar. Then set both the Width and Height to “6.75 in”. Click anywhere in the image to create the square selection. Then click and drag inside the square of marching ants and move the selection so that it is centered in the image. It should “snap” to the guidelines once it is close to the center.
-
Click on the Create a New Layer icon in the Layers palette. Set the foreground color to a dark color that coordinates with your other photos (dark brown in the example). Then use the Paint Bucket Tool to fill the selection with the foreground color. Control-D to deselect.
-
File>Open the center kaleidoscope that was created in Kaleidoscope Kreator. Control-A to Select All, then Control-C to Copy. Make the kaleidoscope frame image active by double-clicking on it in the Photo Bin. Control-V to paste the kaleidoscope in the center of the kaleidoscope frame image.
-
File>Save As and save the image so that you don’t lose the work you’ve done so far. Save it to a new file in PSD format.
-
Now it’s time to crop and resize the remaining photos. Ultimately you want photos in the following quantities and sizes:
(4) 1.625” x 1.625”
(2) 1.625” x 3.25”
(2) 3.25” x 1.625”
Let’s work on the square (1.625” x 1.625”) photos first. File>Open the first photo that you plan to crop to a square. Choose the Crop Tool and then in the Options Bar, set the Width to “1.625 in”, the Height to “1.625 in” and the resolution to 300 pixels/inch. Now click and drag with the mouse over the area that you want to use in the photo. After you click and drag the initial square selection, you can resize it and/or move it around (click and drag inside the selection marquee) to refine the selection. When you are happy with the position of the selection marquee, click on the green check mark at the bottom right of the selection. This will not only crop but also resize the photo to the correct size for the layout. Now Control-A to Select All and Control-C to Copy. Then double-click on the kaleidoscope frame layout image in the Photo Bin and Control-V to paste the square photo into the image. Choose the Move Tool and move the photo into position in the layout. (There should be a slight “border” of the dark brown around the outside edge of the photo.) Repeat for the remaining three square photos.
The rectangular photos will be cropped the same way except that you will need to specify different Width/Height values according to what is listed above. Also, after you have cropped and resized to the rectangles, you will want to “fade” the photos a bit before adding to the layout. The easiest way to do this is to create a new layer above the photo. Then fill the layer with white and reduce the opacity of the white layer to 40%. Finally Layer>Flatten Image before copying the photo to move it to the layout.
Once all of the photos are positioned on the layout, there should be about 1/8” of space between the photos as well as about 1/8” of the brown square around the outside edge of the photos.
- To add a little dimension to the layout, click on the brown square layer in the Layers Palette and add a drop shadow. Next click on the yellow square layer in the palette and add an inner shadow (another one of the layer styles).
- Lastly, add text in the yellow “mat” area of the layout. To make the text go around the center photos, work on one side at a time. Type text the length of the bottom edge, then Image>Rotate>Layer 90° Left (or Layer 90° Right) to run the text up and down the left and right edges, respectively. (Alternatively, print the page layout before adding the text and then handwrite the journaling.)
- File>Save.
|