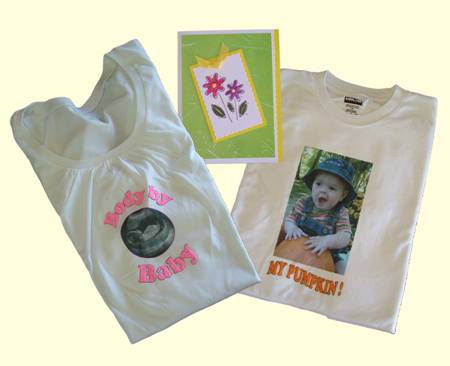
T-Shirt:
You can create the design in Microsoft Word (or a software program you are comfortable with) as follows:
- Open a new document, 8 ½” x 11”.
- Under the View menu, check to make sure the following Toolbars are open: Standard, Formatting, Auto Shapes and Drawing.
- Go to Insert Picture and use the drop down menu to select your photo. Size the photo by clicking on it then click on a corner with the cursor. By grabbing this corner you can make it smaller or larger.
- Click on Insert Word Art. Click OK. Choose the font and size then type your title into the box. Click OK.
- The title will now appear in your document. This will be an outline text format – black outline with a white fill. Change the fill to a your desired title color by clicking on the Fill Color icon. You can re-size the text by clicking and dragging the corners. You can also move the text by clicking on the center. A hand icon will appear. Hold down while moving title into place.
- To shape your title, click on the word and a WordArt Edit Text box will appear on your screen. Click on the icon that looks like a letter A with a thick half circle behind it. A number of shapes will appear. Experiment by clicking on different ones to see which you like best. After creating a shaped title you can always adjust the size, etc by clicking on it and dragging on the corners.
- To create the “Body by Baby” title, I created the upper curve first with “Body by” then the lower curve “Baby”. I then moved them into place around the photo as shown.
- Print according to directions on the packaging. MAKE SURE THE IMAGE PRINTS IN REVERSE SO IT WILL BE THE RIGHT WAY WHEN IRONED ONTO THE SHIRT. This can be done with a printer selection, or you can flip everything horizontally in Word by dragging a right hand corner over to the left on your photos and title elements. Try it and see, you’ll be amazed at how creative you can be!
- Following package directions, iron your photo and title onto the front of the shirt. Let cool then color in the areas of your title with the corresponding color of Puffy Velvet markers. Move the heat embossing tool back and forth across the title to activate.
You can create lots of fabric designs, with or without photographs, for birthday parties, family reunions, sports teams, school events, etc. and with a variety of fabric markers this can be a fun “coloring” project for children of all ages! Fabric markers can also be used on paper, so try this fun card project.
Card
- Make a basic card using the instructions in the Punched Embellishment project from show 1305, or use one of the many blank cards that are readily available at craft stores. Cut a piece of patterned paper ½” smaller then the length and width of the front of the card. Center then adhere to the front.
- Stamp a design onto a piece of white cardstock. Cut around the design with the trimmer and wave edge blade. Color the design with the puffy velvet markers then heat with the embossing tool to raise the color.
- Mat with yellow cardstock then adhere to the front of the card. Embellish with a small scrap of ribbon.