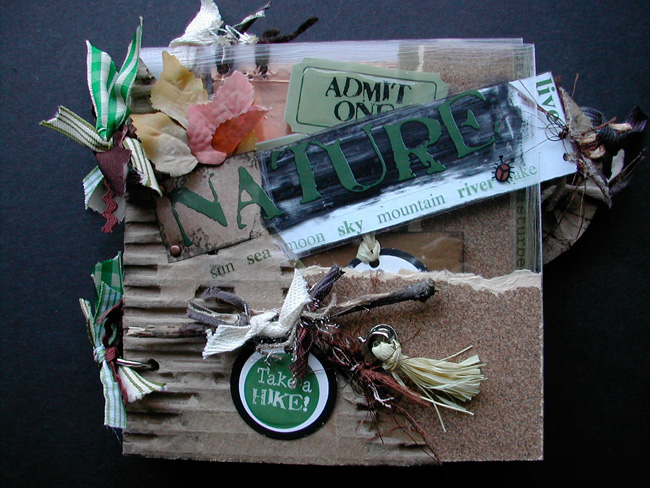
Cover:
1. Sand the edges of the acrylic page with sandpaper and paint a swatch of black acrylic and let dry. You only need to sand on one side of the page.
2. Cut cardboard to 1 piece 6” x 5 1/2”. Now rip the top layer off, exposing the raw corrugated middle.
3. Next cut sandpaper or cork 3” x 4” and tear the top edge. ear with the sandpaper side up and tear toward yourself to get the nice raw edge.
4. Glue down sandpaper first and the corrugated cardboard onto the top but first add on the bulldog clip with raffia tie through the hole and a piece of fiber tied in a knot around the base.
5. Tie a tag to the twig and add the “Take A Hike” sticker to cover it. Cover the sticker with Diamond Glaze or Crystal Lacquer. This will give it the look of an epoxy sticker. Do this last as it takes an hour or so for it to harden and dry. Tie more fibers on the twig and use glue dots to stick it down to the cardboard.
6. Place “Nature” sticker down, using a small piece of card stock under the letters “NA” because the sticker doesn’t stick well on the corrugated. Punch 2 holes with the Crop-0-Dile and add brads.
7. Add in the “sun sea moon” sticker and cut a ladybug from the sticker to add color.
8. Finish by tucking 2 small leaves under the “NA” tag and adhere with glue dots.
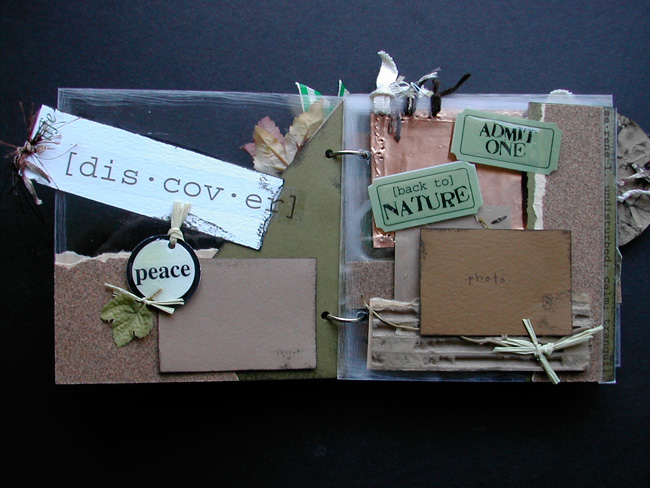
Page 2 - Discover
1. Make sure to sand all edges of acrylic pages. You only need to sand on one side of the page.
2. Cut 1 piece card stock 6” x 3” and cut at a diagonal. Cut 1 - 3” x 4” piece of sandpaper and tear the top. Glue sandpaper first. Ink card stock edges and glue down.
3. Cut 2” x 5” white piece, ink both sides and add stickers. Punch 2 holes in the edge to tie fibers through and glue down.
4. Add round tag and add “Peace” sticker.
5. Cut 2 1/2 x 3 1/2 card stock frame and use pop dots to glue it down for photo matte.
6. Add “Peace” tag with pop dots. Clue on silk leaf, tie with raffia and glue with a glue dot. Finish off the page by using Diamond Glaze on the “Peace” sign tag. This will give it the look of an epoxy sticker.
Page 3 - Admit One
1. Make sure to sand all edges of acrylic pages. You only need to sand on one side of the page.
2. Cut 2” x 6” strip of sandpaper and 3” x 6” strip of card stock. Ink the card stock edges and glue down. Tear the 6” edge of sandpaper and glue down leaving 1/4” edge for “se-rene” sticker.
3. Stick down ticket stickers and add 2 1/2” x 3 1/2” photo mount.
4. Before photo mount gets glued, add 4” x 1 1/2” strip of corrugated that has been stripped down to add texture.
5. Add a twig tied with raffia using a glue dot.
6. Punch 3 holes at the top and tie twine and fibers into holes.
Page 4 - “Scenic Beauty”
1. Make sure to sand all edges of acrylic pages. You only need to sand on one side of the page.
2. Paint 2” squares of white acrylic over card stock from back side and let it dry. This will mask part of what is showing through from the other side.
3. Cut 2 1/2” x 3 1/2” photo mount and layer onto 2 3/4” x 3 3/4” mat. Add brads before using pop dots to adhere down.
4. Before adhering mat, add 9 3” x 1 1/2” pieces of sandpaper with torn edge. You can also use cork type paper for this.
5. When paint is dry, add 3 leaf icon stickers and 2 SRM Just the Ticket stickers.
6. Finally, put the photo mount down and embellish with dried flowers tied with raffia.
7. When you are all done with this page, add diamond glaze over the individual leaves on the 3 leaf square icons. This will give it the look of an epoxy sticker.
Page 5 - “Great Outdoors”
1. Make sure to sand all edges of acrylic pages. You only need to sand on one side of the page.
2. Cut 2 pieces of copper 4” x 3”. One will be used here on page 5. The other will be used on page 8. Use a push pin to poke holes and a pen or pencil (on the back side) to add border detail. Use pop dots to adhere copper photo mount.
3. Add 6” x 1” sandpaper strip next and add in the “great outdoors” sticker on the bottom left and the “Nature’s Peace” sticker on the upper right side.
4. Top off with inked chipboard swirl. Add to page with pop dots and coat with diamond glaze. This will give it the look of an epoxy sticker.
Page 6 and 7 - “O U T D O O R S”
1. Make sure to sand all edges of acrylic pages. You only need to sand on one side of the page.
2. Cut 2 pieces of dark green card stock measuring 1” x 6”. Edge with distress ink and glue down.
3. Cut your photo mats, sized for 2” x 3” photos. Edge with distress ink on the inside mat and glue down.
4. Next, using the “OUTDOOR” sticker, cut each letter into a separate piece. O/U/T/D/O/O/R so that you 7 individual letters. Mount each letter on card stock alternating colors of browns, greens, golds. Now using scissors, cut each letter out. Attach the letters to the green strip of card stock using pop dots to pop them up. Layout the letters starting with the “S” and ending with the “O” so you leave room for your leaf icon on page 6,
5. Sticker the lady bug stickers down to 2 punched circles and use pop dots to glue them down.
6. Lastly, ink the edges of a circle tag and put the leaf icon on an angle on the tag. Tie a bit of raffia in a knot with the longer ends at the top. Use 2 or 3 pop dots to adhere the tag to the raffia and glue down.
7. When you are all done with this page, add diamond glaze over the leaf icon. This will give it the look of an epoxy sticker.
Page 8 - “Explore/Nature”
1. Make sure to sand all edges of acrylic pages. You only need to sand on one side of the page.
2. Adhere down copper photo mat with pop dots.
2. Add another piece of 1” x 6” sandpaper.
3. Using pop dots and another dried flower sprig. Use 1” round circles to add 2 square stickers that say “explore” and “nature”. Trim squared edges and pop dot onto page.
4. Add “Explore” definition sticker on top of sandpaper strip. Use your fingers to press that down well so that it will adhere to the sandpaper.
Page 9 - “EXPLORE” with leaf
1. Make sure to sand all edges of acrylic pages. You only need to sand on one side of the page.
2. Use paper bag, crumple it up, flatten it out and cut a 3”-4” circle. Then cut it in half. Ink each half. Add stickers to both halves, punch 2 holes and add fibers.
3. Glue down 3” x 6” card stock strip and stick the “EXPLORE” sticker down next to it.
3. Paint a 2” circle on the acrylic page and let it dry. Add a 2” x 5” piece of patterned paper card stock or ribbon and add the 2 half circles to the top front and back of the 6” x 6” page. Add all silk leaf with fibers tied around stem to your page with a pop dot.
4. When paint is dry, add a “take a hike” sticker with a pop dot, cover with diamond glaze and let dry. This will give it the look of an epoxy sticker.
TIP: Do all pieces coated with Diamond Glaze last so that they will all dry together. Allow 1 hour drying time.
Page 10 - Word Tag
1. Make sure to sand all edges of acrylic pages. You only need to sand on one side of the page.
2. Cut a piece 1” x 6” of card stock, ink the edges and adhere over where the “EXPLORE” sticker is showing through from the other side.
3. Put a “birds & bees - flower & trees” sticker next to the card stock strip on the left side.
4. Cut a 2 1/2” x 3 1/2 photo mount, ink edges and use pop dots to adhere.
5. Cut a 1 3/4” x 4 1/4” card stock tag. Crumple the tag, then uncrumple and ink the edges. Add all of the SRM word stickers to the tag plus 1 ladybug sticker. Then tie and mount with pop dots to your page.
Page 11 - Word Strips
1. Make sure to sand all edges of acrylic pages. You only need to sand on one side of the page.
2. Stick “nature” definition sticker over bottom of card stock.
3 Cut a 4 1/2” x 4 1/2” card stock square, ink edges and adhere down.
4. Cut apart “sun sea moon sky mountain river lake desert” sticker and adhere to different colors of card stock. Trim with scissors and glue down.
5. Using 1 more little twig, add a small silk leaf and a piece of fiber and pop dot down to the page.
Back Cover - Tree
1. Ink the edges of a 4 1/2” x 4 1/2” piece of card stock and then glue it down. Use left over scraps to layer under the 4 1/2” x 4 1/2” square.
2. To create tree, hand cut a simple tree outline. Cut assorted colored card stock into little pointed oval leaves. Ink the edges of tree and leaves.
Glue down to 3” x 3” piece of card stock with inked and doodled edges.
Doodle edges of tree and leaves as well. Add “escape” sticker at bottom right of tree and glue down.
3. Add “Nature’s Peace” tag mounted on card stock with a tag tie and use pop dots to stick it down.
To finish the mini book, use 1 1/2” “O” rings and tie on the last bits of ribbon, twine and fiber.
If you saved the diamond glazing for last, do one side of each page, let it dry, flip it over and do the other side.