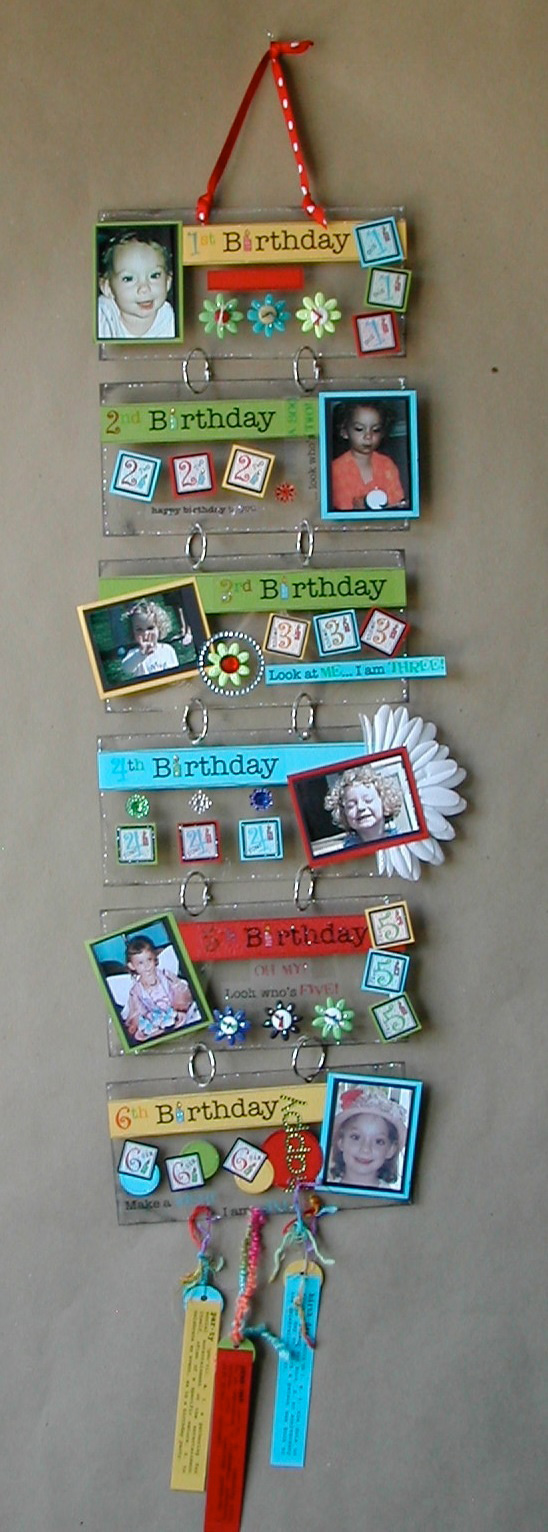
This hanger has 3 elements on each piece that repeat throughout the design.
1. The 1” x 6” colored strip to showcase the 1st - 6th birthday stickers.
2. The black and primary photo mounts using 2 1/2” x 3 1/2” black mats and
2 3/4” x 3 3/4” colored back mats.
3. The glitter glue and black staz on ink around the borders that all keeps it flowing throughout the piece.
Before you start:
- Use black staz-on ink to ink your acrylic pages edges.
- Cut all your 1” x 8” strips for title stickers (6)
- Cut your 2 1/2 x 3 1/2” black photo mats (6)
- Cut your 2 3/4” x 3 3/4” colored back mats (6)
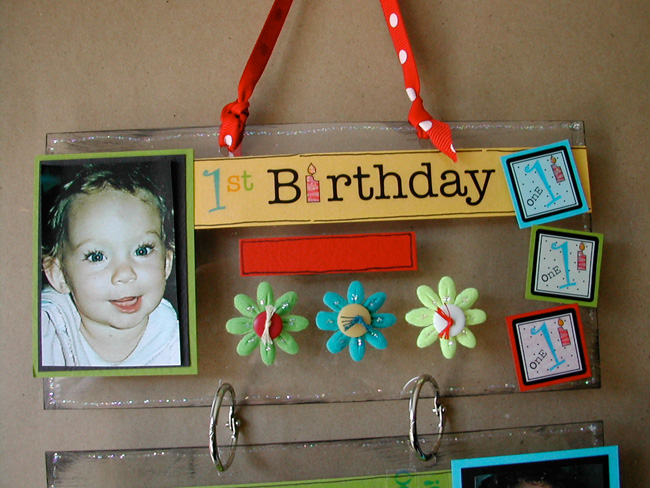
1st Birthday Panel
1. Adhere the title border strip with sticker and add doodle edge with pen.
2. Place photo mat on left and glue down.
3. Mount the three squares with “1st” onto colored cardstock and trim.
4. Pop dot those 3 squares onto right side of panel.
5. Cut a small colored frame to put birthday child’s name on for personalization.
6. Use glue dots to adhere felt flowers down, thread embroidery floss through buttons and add a pop dot to glue them to center of flower.
Note: All pages get glitter glue, but it is easiest to do all pages all at one time, after they are all finished so that they will all dry together.
2nd Birthday Panel
1. Repeat steps 1, 2 and 3.
2. Pop dot the three squares with “2nd” onto center bottom of page.
3. Add clear stickers (happy birthday to you) at bottom center and the other sticker (Peek-A-Boo looks who’s 2) up the side next to photo mount.
Refer to photo for proper placement.
4. Add rhinestones to accent.
3rd. Birthday Panel
1. Repeat steps 1, 2 and 3.
2. Pop up three squares “3rd” and place in middle right of panel as shown.
3. Add the “Look at Me...I am three” sticker after mounting it onto colored cardstock and pop it up on the lower right side of the page.
4. Add MAMBI rhinestone circle over photo mount and add a Prima flower and rhinestone to the center.
4th Birthday Panel
1. Repeat steps 1, 2 and 3.
2. Before mounting photo mat, cut a Heidi Swapp flower in half and glue it down to the right side of the page.
3. Glue the three squares of “4th” to the bottom of the page with pop dots.
4. Add 3 Prima sparkles right above the 3 “4th” squares.
5th Birthday Panel
1. Repeat steps 1, 2 and 3.
2. Add the three “5th” squares to right side with pop dots.
3. Add the “Oh My Look Who’s Five!” sticker under the title strip.
4. Add 3 flowers with buttons laced with embroidery floss in the center.
Use glue dots to adhere.
6th Birthday Panel
1. Repeat steps 1, 2 and 3.
2. Punch 1 large circle and 3 small circles from solid cardstock and glue down randomly.
3. Add MAMBI “Happy” rhinestone sticker.
4. Add the three “6th” square matted stickers.
5. Place the “Make A Wish! I Am Six” sticker to the bottom of page.
Also on the 6th Birthday Panel:
1. Punch 1 more hole with the Crop-O-Dile in between the other 2 holes.
2. Use scraps of cardstock 1” long x 4” wide and punch 3 circle punches. Glue circles to the top of strips and punch a Crop-O-Dile hole in center. Using the left over definitions from your 1st - 6th birthday stickers, place them on the front and back of the strips.
3. Tie into holes at different lengths so these strips dangle down at the bottom.
After completing all 6 panels:
1. Add Glitter Glue wherever you feel like it. You can glitter glue the edges, the flowers, the candles on the stickers or randomly glitter glue any other part of the stickers. Have fun with the glitter glue! Make sure that the glitter glue is completely dry, at least one hour.
2. Finally, add the “O” rings to assemble pieces and tie a ribbon at the top to hang.