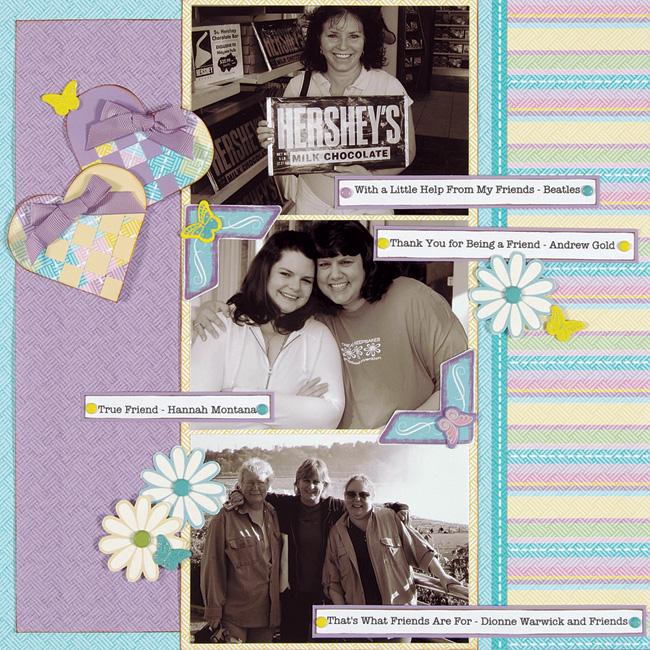
Songs of Friendship
Supplies:
- Personal Shopper Scrapbooking May Kit from Hot Off The Press (includes Winged Things Finished in a Flash™ Page Kit for Brad Buddies; also includes Scandiavian Hearts template from Hot Off The Press)
- brown ink pad
- foam tape
- Zots™
- white cardstock
- sandpaper
- scissors, pencil
Instructions:
-
Cut a 8 ¾” x 11 1/4” piece of purple texture paper and ink the edges. Adhere to the border background paper, placing the border along the left side of the page.
-
Cut a 6 1/2”x12” piece of yellow texture paper and ink the edges. Glue over the purple paper.
-
Trim photos and adhere to the page. Print journaling onto white cardstock and ink the edges. Mat journaling on purple paper and adhere at the bottom of the page.
-
Print song titles onto white cardstock, ink the edges and mat on purple paper.
-
Adhere title strips near the photo and add mini brads to the ends of the strips.
-
Add a flower punch-out and butterfly shaped brad along the strips with foam tape.
-
Lightly sand the edges of the photo corner punch-outs and adhere to the corners of a top photo and the bottom corner of the purple paper on the background. Add decorated butterfly brads to the centers of the corners.
-
Trace the large heart onto the white side of the yellow and argyle papers. Follow the template instructions to weave a large heart accent. Ink the edges.
-
Cut a small yellow paper square and ink the edges. Mat on purple paper and adhere to the heart. Add the butterfly Brad Buddy™ to the square. Tie a small bow of purple ribbon to the top of the heart; Zot™ onto the heart. Use foam tape to attach the heart to the background paper.
-
For the second page, crop photos and adhere on one strip of yellow texture paper. Ink the edges.
-
Cut a 3 ½” x 11 ¼” piece of purple texture paper and ink the edges. Adhere under the yellow paper and then to the background paper—again placing the border along the right edge of the page.
-
Add sanded corners around one of the photos and a decorated brad to the center of the corner.
-
Trim title strips and ink the edges. Mat on purple paper and adhere along the photos. Add mini brads to the ends of the strips.
-
Trace two smaller hearts from the template using argyle, yellow and purple papers. Cut out the shapes, weave the hearts together and ink the edges.
-
Add ribbon bows to the tops of the hearts and layer at the top corner of the page. Add foam tape under the top heart for dimension.
-
Add a butterfly brad next to one of the hearts.
-
Add flower punch-outs and shaped brads along the edges of the photos.
- Lightly sand across the tops of the shaped brads to highlight the details.
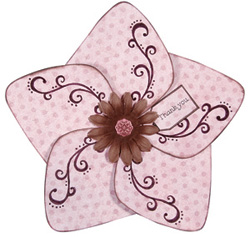
Thank You Giant Folded Flower Card
Designer: Susan Cobb
Supplies:
• Giant Star Card Template from Hot Off The Press
• Bohemian sarapapers™ from Hot Off The Press
• Bohemian Embellish-abilities™ from Hot Off The Press
• Brown ink pad
• Brown pen
• X-acto® knife for inserting brad
• scissors, pencil
Instructions:
1) Place the template on the white side of the pink dots paper. Use the template to trace the design, then cut it out. Turn the template over and align it with the pink petals. Add the swirls to each petal with the brown pen. Ink the edges of the petals and let dry.
2) Fold in the petals on the fold lines in a clockwise direction as shown on the template instructions.
3) Use the template to trace a small tag from pink dotted paper. Mat on brown paper, then write “thank you” on the tag.
4) Use the template to trace the inside shape of the large star, trim slightly smaller and glue to the inside of the of the giant star.
5) Ink the embossed brad and add to the small brown flower. Make a hole at the center of the inside (use the template as a guide) then close the card. Attach the brad with the flower through the center hole on the inside, with the flower on top of the card.
6) To open the card, pull the petals out from the center. Write your message above and below the flower on the inside. To close, tuck the petals beneath the center flower.
|