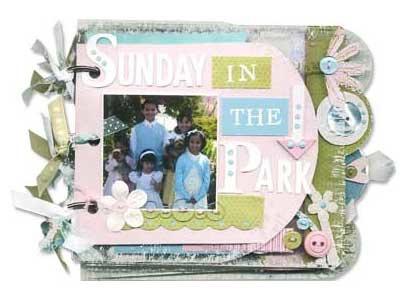
Acrylic scrapbooks are the latest in the scrapbooking world. They are not only beautiful, but they definitely give the scrapbooker a way to showcase their art form in a unique way. The acrylic pages should be built with the idea that each page adds to the next. In this segment we show you how to create the first page of the Sunday In The Park Album.
Step 1: Painting album cover
* Using a flat paintbrush and Delta Magnolia White paint, dry-brush the edges of the album to create a finished edge.
* Scrape away any excess paint with your fingernails as the paint dries.
Step 2: Adhering paper to album cover
* Using the album cover as a template, trace the shape of the front cover onto the backside of Blush Textured Cardstock. Trim around traced image and using your paper trimmer cut 1/2" straight across top and bottom of the Cardstock. (This will allow the Acrylic Album to be exposed on the top and bottom of the front cover.)
* Using an Artists Photo Adhesive product adhere the Textured Cardstock to the backside of the Acrylic Album cover.
* Using Crystal Blue Exclusive Inks(tm) Pad and cut portion of the Dimensional Elements Fresh Shapes Scallop frame sponge the scalloped border and adhere to back of Acrylic Album with Artists adhesive spray. Scallop should be placed overlapping top of Textured Cardstock to create a layered look from the front side of the album.
Step 3: Building front cover
* Using the Color Ready Bold Alphabet and Color Ready Oxford Caps Alphabet, adhere title to album cover; add dimension by stacking alphabet letters.
* Using Tombow adhesive adhere embellished photo piece to album cover; Glue Dot button to Just Blooms daisy and adhere to finish row of buttons below photo.
* Using Clear Watermark Exclusive Inks(tm) Pad and White Embossing Powder, stamp remaining title on previously cut strips and adhere to cover.
* Adhere embellished arrow (featuring Cottage Edge Anchors and Dimensional Elements Fresh Shapes) to album cover.
* Apply Liquid Glass to 1/8th punched Crystal Blue dots on arrow and capital letters.
* To finish, tie varying lengths/varieties of ribbon to rings.
|