Project 1409-2


Colorbök - Crayola Door Decoration
By: Brittany Zeller-Holland
Sponsor: Colorbök

For more information visit:

www.colorbok.com


Materials Needed:
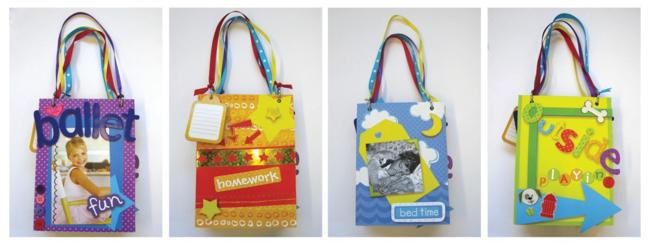
  • Photos of day-to-day activities (not required, could be drawings done by children of the activities)
  • Foam Tape
  • Glue Dots
  • Hole Punch – 1/4”
  • Buttons
  • Coordinating Ribbon, Approximately 4-20” pieces
  • 2- Binder Rings
  • Crayola Glitter Glue
  • Colorbök, Inc. Crayola Creative Paper Crafting Pack
  • Colorbök, Inc. Crayola Day in the Life Of Crafting Kit
  • Colorbök, Inc. Crayola Bubble Stickers
  • Colorbök, Inc. Crayola Specialty Borders
  • Colorbök, Inc. Crayola Die-cut Shapes
  • Colorbök, Inc. Crayola Rub-ons
  • Colorbök, Inc. Crayola Foam Accents

Instructions:

For All Panels:

  1. Cut number of panels from cardboard or packaging (6”x8”)
  2. Adhere patterned paper to cardboard and trim to edge
  3. Hole punch with 3 hole or single hole punch

Ballet:

  1. Cut mat from blue solid paper; adhere to panel.
  2. Take photo and apply rub-on the left side with provided popsicle stick.
  3. Arrange photo and star into pleasing place above the mat and secure with double-sided tape or glue.
  4. To create the title, use the Glossy Foam Alphas to spell “ballet.”  It doesn’t matter that the letters don’t fit perfectly, just make sure you’re not covering any important piece of the photograph.  Adhere with glue or double sided tape.
  5. Add accents such as the epoxy Love sticker and “fun” with foam tape to add dimension.
  6. Further addition of buttons will accent the page.  (Used hot glue but glue dots would also work well.)

Homework:

  1. Cut approximately a 3.5 inch wide piece of red paper, more than 6 inches wide for the pocket.
  2. Use Crayola border accent rub-ons as decoration on red pocket.
  3. Use double stick tape on panel to designate where the pocket will go.  Adhere red pocket and rub to secure.
  4. Using Crayola “Specialty Borders” to add extra strength to pocket by gluing near top of pocket and wrapping all the way around.
  5. Glue paper star to top of panel.  Off the page adds interest.  Add star punch-out on top using foam tape for dimension.
  6. Add another star punch-out from “A Day in the Life Of” kit to the bottom left to balance design.
  7. Crayola arrow rub-ons signify where a homework note or reminder could go.
  8. Lastly, add “Homework” punch-out as title.

Sleepy Time:

  1. Cut photo to square.
  2. Take wave-like blue paper from “A Day in the Life Of” kit and create a border by cutting along one of the waves.  Adhere to bottom of panel – edge to edge.
  3. Adhere yellow tag to panel with double-sided tape or adhesive, on top of wave border.
  4. Glue photo corners on top and then use foam tape to mount photo to panel.
  5. Take “Bed time” punch out and mount to white paper or cardstock.  Trim with scissors to create border.  Adhere to panel with foam tape.   Same with moon.
  6. Accent with Glitter Paint on title and moon.

Outside Playing:

  1. Cut yellow paper from “Creative Paper Crafting Pack” to a slightly smaller size than panel.  Approximately 5.5”x7.5”
  2. Use green punch-out frame from same crafting pack slightly offset on page to create shape.  Trim to edge.  Adhere with foam tape.
  3. Adhere blue arrow from Crayola “Die-Cut Shapes” to the bottom of the frame.  May extend past edge of panel and that’s o.k.
  4. To adhere letters OUTSIDE to panel use foam tape.  The easiest way to cut foam tape to this small of size is to cut a piece with scissors and then cut smaller pieces using an x-acto blade.
  5. And PLAYING can be adhered flat to the panel in a zigzag manner with glue or double-sided tape.
  6. Accent with Crayola “Bubble Stickers” like the dog accents shown.

For All:

  1. Can add tags in between on the binder rings to journal or write special notes.
  2. Make sure holes are punched all the way through the panels and use binder rings to group all together.
  3. Choose a coordinating ribbon for each page and cut to the same size, approximately 18-20 inches.  Tie each end to the ring with the appropriate page showing. 
Guest:

Brittany Zeller-Holland


Copyright © 2009 Scrapbook Memories, All Rights Reserved