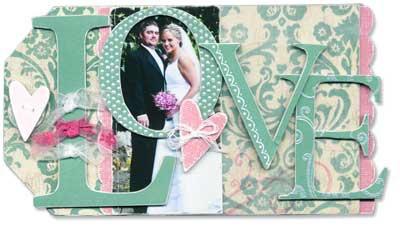
Chipboard is a versatile product that can be used to embellish, give dimension and dress up scrapbooking and paper crafting projects. Chipboard is a cardboard-like material. It is thinner than most cardboard and thicker than cardstock. Chipboard is easy to use, and a great way to dress up your scrapbook pages and other projects. In this segment we show you how to create the first page of the LOVE mini album.
1 - Remove the post from the album. Adhere Background & Textured paper to the cover. Sand the edges to smooth.
2 - Adhere vellum piece flush with the right edge. Adhere decorative scallop piece to the INSIDE right edge.
3 - Adhere photo 2" from the Left Edge.
4 - Create the Dimensional Element word LOVE:
L: COVER WITH CARDSTOCK - Trace the Dimensional Element upside down onto the Cardstock (so the pencil marks will not show on the front). Use Micro-Tip scissors to cut it out. Adhere the Cardstock shape to the front of the Dimensional Element, lining up edges. Sand edges with emery board or Finishing Files to smooth.
O: STAMP & PAINT - Cover with Cardstock as shown previously. Stamp the background stamp directly onto the Dimensional Element using the same color ink as the Cardstock. Use the large end of the Dry Emboss Stylus to dot the stamp marks with paint. Re-dip the stylus in the paint every two dots or so to keep size consistent. If become too large, clean stylus and continue.
V: RUB-ON's - Cover with Cardstock as shown previously. Cut the Rub-On border into a piece large enough to fill desired space on the Dimensional Element. Apply Rub-On with the enclosed Rub-On tool.
E: STAMP & EMBOSS - Cover with Cardstock as shown previously. Stamp with the Playful Flourishes stamp repeatedly on the Dimensional Element using Clear Watermark Emboss Pad. Sprinkle with Silver Pearl Embossing Powder. Heat with the Craft Heater.
5 - Adhere the Dimensional Elements to the album. Center the O over the faces in the photo so they show through the center. Overlap the letters as needed. Adhere them using Glue Dots and 3D Foam Squares.
6 - Continue to embellish cover by adding Dimensional Elements hearts.
|