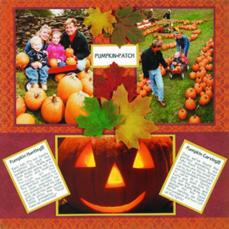
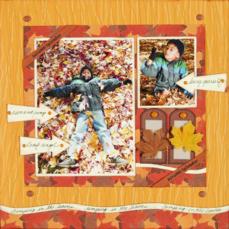
Pumpkin Patch
Designer: Tessa Bundy
Supplies:
• Autumn Background Papers from Hot Off The Press
• Autumn Leaves from Hot Off The Press
• yellow cardstock
• white paper
• black pen
• Zots™
Instructions:
1) Cut a 4 1/2"-wide strip of burgundy paper and glue it horizontally across the orange patterned paper, placing it 1/2" from the bottom of paper. Mat a horizontal photo and two 2 1/4"-wide pieces of journaling onto yellow cardstock, leaving a 1/8" border all around. Glue the photo in the center of the burgundy strip, then glue the pieces of journaling angled to overlap the photo.
2) Mat two vertical photos on burgundy paper, leaving a 1/8" border. Glue across the orange paper at the top of the page, leaving 2" between them. Mat a 2 1/4"-wide journaled title on yellow cardstock, leaving a 1/8" border. Glue horizontally between the photos, about 2" from the top and overlapping the inner edges slightly.
3) Chalk a large yellow leaf with brown, adding color to the outer edges of the leaf. Repeat with a small yellow leaf. Add dark orange chalk to a medium green leaf, and green chalk to a medium brown leaf. Add brown and green chalk to a medium orange leaf. Use Zots™ to attach all the leaves to the page, placing them above and underneath the page title and overlapping them on the edges of the photos.
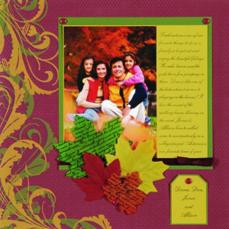
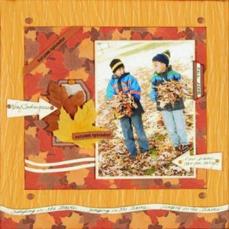
Diana, Dan, Jamie and Allison
Designer: Susan Cobb
Supplies:
• Autumn Background Papers from Hot Off The Press
• Autumn Leaves from Hot Off The Press
• Cardmaker’s Jewel Ribbons from Hot Off The Press
• Delicate Patterns Acrylic Stamps from Hot Off The Press
• Clear Acrylic Block from Hot Off The Press
• yellow cardstock, green cardstock
• Black StazOn ink pad
• black pen
• Zots™
Instructions:
1) Place the swirl background paper with the swirl border on the left. Mat a photo on yellow cardstock, leaving extra space at the right for journaling. Journal with the black pen. Glue to the green cardstock, then glue ribbon across the bottom. Zot™ a bow a the right side of the ribbon border. Attach to the upper right portion of the background paper and add maroon brads at the top corners.
2) Journal on yellow cardstock and trim to a rectangle, then trim corners to a tag shape. Mat on green and attach near the lower right corner with a brad.
3) Use the script stamp to stamp a small orange leaf and a large green leaf. Arrange leaves over the bottom of the photo, overlapping each other and attaching with Zots™. Add a brad at the bottom as shown.
Playing in the Leaves
Designer: Laura Nicholas
Supplies:
• Autumn Background Papers from Hot Off The Press
• Autumn Leaves from Hot Off The Press
• Journaling Template from Hot Off The Press
• Autumn Splendor printed ribbon
• cream cardstock
• Black StazOn ink pad
• black pen
• Zots™
Instructions:
1) For both pages; Use the template to trace the long wave pattern onto each sheet of leaves, 1 ¼” from the bottom edge. Cut out and glue one piece to the bottom of each gold lines paper. Ink the edges of each page. Cut two 9 ½”x 8 ½” leaves papers, ink the edges. Glue and tape the edges of a 5” length of ribbon to the left corner. Glue one piece centered on each page. Insert brown brads next to each corner as shown.
2) Photos for the left page: Mat a 5”x7” photo onto cream cardstock. Ink the edges, then glue centered on the right side of the leaves piece. For the right page: Repeat with a 5”x7” photo and a 2 7/8”x3 ½” photo.
3) Journaling for both pages: Use the template to cut out two wavy lines from cream cardstock. Write “jumping in the leaves” three times on each, then ink the edges. Glue along the top of the leaves pieces. Use the template to cut out five arrows from cream cardstock, then write on each and ink the edges. Insert mini brads into both ends of each arrow, then foam tape them pointing into the photos or leaf collage. Write the date on a 1/8”-wide strip of cardstock, ink the edges, then glue to centered on the brown tab. Foam tape it in place.
4) Technique for accenting the photo mats: For the left page—use the template to cut two 4” wavy strips from cardstock. Ink the edges, then glue to the leaves mat as shown. Glue a tag above the wavy strips, then insert a brad in the top. Glue two silk leaves layered on the tag. Zot™ a length of “autumn splendor” overlapping the bottom leaf and photo. For the right page—repeat, making one 4” wavy strip. Two tags each hold a silk leaf and brad. Add another length of printed twill as shown.

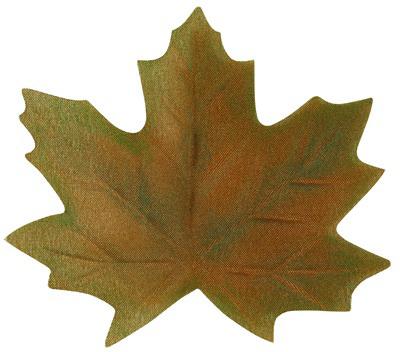
Leaves:
Brown Ink Pad
Supplies:
• Autumn Leaves from Hot Off The Press
• Brown StazOn ink pad
Place the orange leaf onto a scrap paper and lightly tap the brown inkpad on the surface of the leaf. Start with a light touch and add more color if desired.

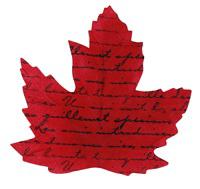
Black Ink & Delicate Patterns Stamps
• Autumn Leaves from Hot Off The Press
• Black StazOn ink pad
• Delicate Patterns Stamps from Hot Off The Press
• Clear Acrylic Block from Hot Off The Press
Place the red leaf onto a scrap paper. Apply the clear stamp to the clear block and stamp the script across the top of the leaf. Re-ink the stamp and repeat until the leaf is completely stamped.
Blue & Green Chalk
• Autumn Leaves from Hot Off The Press
• Blue chalk, green chalk
• cotton swab
Place the brown leaf onto a scrap paper. Use the cotton swab to apply blue and green chalks along the veins of the leaf.
Red Ink Pad & Stipple Brush
• Autumn Leaves from Hot Off The Press
• Red StazOn ink pad
• Stipple brush
Place the yellow leaf onto a scrap paper. Tap the stipple brush into the red ink pad, the tap color along the outside edges of the leaf.
|