 Supplies: Supplies:
- 810 Cookbookin’ TM Mom’s Diner Recipe Scrapbooking Kit
- 930 Cookbookin’ TM Mom’s Diner Appetizing Accents
- Unibind 6” x 4” Linen Hardback Landscape PhotoBook
- Unibind PhotoBook Creator
- Scor-It TM Board
- 12” x 12” sheets of black card stock
- 6” x 4” piece of coral/pink card stock
- (1) 5-1/4” x 4” piece of white card stock
- 4” length of 1/8” decorative black ribbon
- 4” length of 3/8” decorative black ribbon
- 12” length of 3/8” plaid or decorative black ribbon
Additional, but optional supplies used: 1/8” hole punch, 2” scalloped square punch.
Instructions:
Double folded page
Page 1
- Cut a piece of black card stock 4” x 11-1/2”. Measure 5-1/2” from right side of the card stock and fold using the Scor-It TM board, refer to manufacture’s instructions. To create the second fold, measure 5-3/4” from the first fold and score the card stock.
- Turn card stock over to decorate Side 1. Cut a piece of the retro scatter paper from the Mom’s Diner kit to measure 2-1/2” x 4”, adhere to page see photo.
- Cut a piece of pink paper with retro stars from kit to measure 4-1/4” x 3-1/4”. Adhere to center of side 1.
- Cut out recipe for Oven-roasted Vegetables recipe from recipe sheet or use your personal recipe here. Adhere to the top of the pink paper.
- Cut two of the corners from the card stock shape sheet on the kit. Adhere to the top corners of the recipe.

Page 1 – Side 1 Page 1 –Side 2
- To decorate Side2, which is to the right of the fold, cut out the dinner plate journaling shape from the card stock shape sheet. Adhere to the center of the page. Personalize as desired.
Double folded page
Page 1
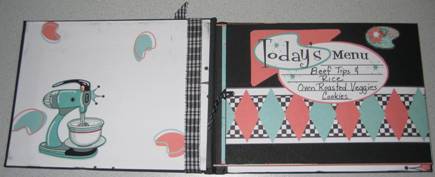
- Flip page over. Cut border from shapes sheet and adhere to page on sides 3 & 4.
- Cut out Today’s Menu journaling shape from shape sheet and adhere to side 3 as shown.
- Punch 1/8” hole in the left hand side of the page - Side 3 near the top of the border. Thread a 4” length of decorative black ribbon through the hole and secure with a loop or knot.
- From the bottom of the mom’s diner paper cut a piece that measures 2-1/2” x 4” as shown. Adhere to side 4, ½” from the right edge of the page.
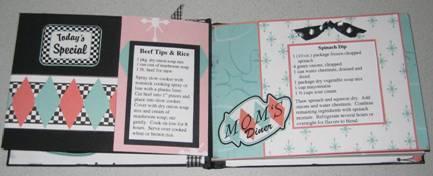
- Cut a black matte from the card stock to measure 2” x 3”. Adhere as shown. Cut Beef Tip recipe from the recipe sheet provided or use your favorite recipe or photos. Apply the Today’s Special sticker to page.
Page 1 - Side 3
Page 2
Page 2
- Cut a piece of the retro scatter paper from kit 6” x 4”. Adhere to the 6” x 4” piece of coral card stock.
- Create a fold on the left side of the page, ½” from edge.
- Cut the square frame the shape sheet. Cut the Spinach Dip recipe from the recipe sheet and adhere to the back of the frame with recipe appearing through the right side of the frame’s window. Adhere to the page. Apply the Mom’s Diner sticker. Make a bow from the 4” length of 3/8” ribbon and attach to frame.
Page 3
- Cut a piece from the bottom of the Mom’s diner paper to measure 3-1/4” x 4”. Adhere to the back of the coral card stock used to create page 2. Page 2 should be reading right side up.
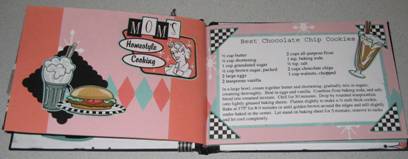
- Using a decorative punch, cut a scalloped edged square from black card stock. Adhere to page. Apply the Mom’s Homestyle Cooking and Hamburger & Shake stickers to page.
Page 4
Page 4
- Cut a piece of the black card stock 6” x 4”.
- Cut a piece of the pink paper with retro stars to measure 6” x 4. Adhere to the 6” x 4” black card stock.
- Create a fold on the left side of the page, 1/2“from edge.
- Cut a piece of the retro scatter paper to measure 5-1/4” x 3-1/4” use to matte the recipe for Best Chocolate Chip Cookies, which you cut from the recipe sheet. Adhere to page 4.
- Cut the 4 black a& white checked corners from the shape sheet and adhere to each corner of the matted recipe.
- Apply the Soda sticker to the page.
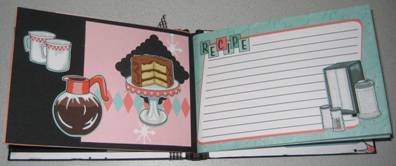
page 5
Page 5
- Cut a piece from right side the mom’s diner paper to measure 3-1/2” x 3-1/2” Adhere to the back of the black card stock used to create page 4. Page 4 should be reading right side up. (the remaining mom’s diner image on the paper will be used for the front cover, it should measure 5” x 3-3/4” – set aside.)
- Using a decorative punch, cut a scalloped edge square from black card stock. Adhere to page. Apply the Chocolate Cake, Coffee Pot, and Coffee Mug stickers to page.
Recipe Card Pages
- Fill the remainder of the book with 4-6 of the recipe cards included in the kit. Personalize and decorate each recipe card as desired.
Binding Pages
Decorate the inner cover and liner of the book cover of the Unibind PhotoBook. Refer to manufactures instructions for use of the PhotoBook Creator.
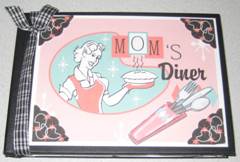
- Adhere the 5-1/4” x 4” piece of white card stock to the cover of the Unibind photobook. Adhere the reserved mom’s diner paper with image on top of the white card stock.
- Cut the decorative corners shown from the shape sheet and adhere to each corner on the cover as shown.
- Apply an Appetizing Accent to the cover.
- Wrap the 12” length of decorative ribbon around the cover as shown and secure with a bow or knot.
- For the liners, cut two pieces of the retro shapes on the white background paper, each will measure 5-1/2” x 2-1/4”. Adhere one piece to the inside of the front and back cover.
Apply the desired stickers or Appetizing Accents.
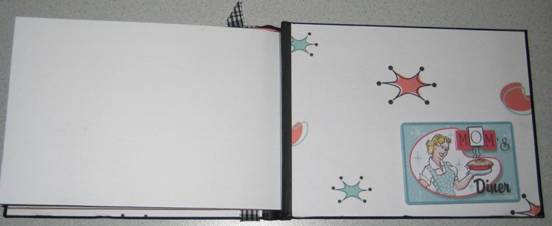
Liner Cover
|