Supplies:
- Walnut Hollow®:
- Wood Canvas
- Creative Metal™:
- Creative Metal Beginner Kit #27996
- Metal Squares, 1 Copper #28005
- Aluminum Metal Roll #27997, 1 roll
- Mats #28009
- Metal Tape #28016
- Oil Pencils (Optional for coloring image) #9924
- Elmers® Craft Bond™ Fabric & Paper Glue, glue for metal to be determined
- McGill®: Floriano Flower Paper Punch
- Plaid® FolkArt® Acrylic Paint:
- Sky Blue #465
- Metallic Inca Gold #676
- Metallic Aquamarine #655
- Metallic Peridot #671
- Matte Liquid Varnish
- Ranger: Adirondack® Alcohol Ink, Eggplant
- C & T Publishing: Lutradur® Mixed Media Sheets, 1 sheet
- The Warm Company™: Lite Steam-A-Seam 2® Fusible Web
- Loew Cornell®: ½” & ¼” Flat Brushes, stencil brush
- The Vintage Workshop™: Click-n-Craft™® Clothing Collage CD-Rom
- 1 Sheet- 12” x 12” decorative scrapbook paper, cut to measure 8” x 9” with decorative edge scissors
- Krylon®: 18kt. Gold Leaf Pen (optional)
- Computer and Printer
- Other supplies: scissors, decorative edge fabric scissors, tissue paper, fine sanding block, paper towels, decorative brad, cosmetic sponge, iron, 5” x 7” piece of muslin, container for water, paper scrapbook flower, hole paper punch (optional), needle (optional),iron
Instructions:
Wood Canvas and Lutradur:
- Open the nozzle of glue. Using a free form swirling motion, apply glue to the Wood Canvas. Note: the nozzle should not be entirely open, allowing small amounts of glue to be applied at a time. Pat the glue with fingers or stencil brush, creating a raised design. Let dry completely.
- Dilute Sky Blue acrylic with a ratio of 1 part paint to 2 parts water. Apply paint to Wood Canvas with 1” flat brush. Completely cover Canvas with paint. Blot off excess if necessary. The areas with dried glue will act as a resist. Let dry completely. Apply one coat of matte varnish. Let dry completely.
- Using decorative edge fabric scissors cut one 6” x 7” piece from Lutradur. Paint Lutradur with diluted acrylic as done in step 2. The Lutradur should have some areas with more paint applied than others, resulting in a translucent, uneven effect.
Tissue Material:
- Using scissors, cut one 4 ½” x 6” piece from Steam-A-Seam 2 fusible web.
- Peel liner sheet from one side of fusible web. Apply torn pieces of tissue paper onto the sticky side of fusible web. Cover tissue with liner sheet. Press with iron. Remove liner sheet.
- Paint tissue with diluted Gold Metallic acrylic, using 1 part paint to 1 part water, completely painting tissue. Using a ¼” brush, apply small highlight amounts of Metallic Peridot and Aquamarine sparingly to Gold painted tissue. Let dry completely.
- Remove remaining liner from the back of tissue material. Place tissue material right side facing up onto muslin. Cover tissue material with liner sheet and press with iron. Trim edges of muslin even with tissue material.
Metal:
Flower
- Insert Copper Metal Square into Floriano paper punch, and punch out design.
- Attach Detailer Point to handle. Using the Detailer Point, doodle a random free form swirl design onto Metal flower.
- Using finger, apply a small amount of Sky Blue acrylic onto flower. Let paint dry. Using a sanding block, remove some paint from Metal flower. Create a hole in the center of flower with paper punch or needle.
- Apply Sky Blue acrylic to decorative brad and wipe off excess with paper towel. Layer paper flower onto Metal flower and secure with painted decorative brad. Set aside.
Image Mat:
- Using Metal Ruler (from kit) and Metal Scissors, cut one 3 ½” x 4 ½” piece from Aluminum Metal.
- Attach Medium Rollers onto handle. Place metal onto blue mat and decorate with designs created by rolling points across the Metal.
- Using a cosmetic sponge, apply Eggplant Alcohol onto Metal Mat.
Image
- Print bird image onto cardstock using the 7” size option. Trim image to measure 3” x 4”.
- Edge image with gold leaf pen (optional).
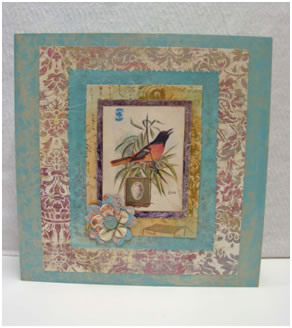
Layering the Collage
- Adhere 8” x 9” decorative paper to Wood Canvas with Craft Bond glue.
- Peel off film from one side of Metal tape and adhere to the back of bird image. Note: a needle works well to start removing the film. Remove remaining film and stick image onto Metal Mat.
- Repeat step 2, applying Metal Tape to the back of the Metal Mat and adhering it to tissue material. Using Craft Bond glue, adhere tissue material/Metal Strip to Lutradur. Repeat adhering Lutradur to Wood Canvas.
- Using appropriate Elmers glue- to be determined, adhere Copper flower to the collage.
Rebekah Meier: www.rebekahmeier.net, www.rebekahmeier.typepad.com
|