Close this window to return to series
200 project listing |
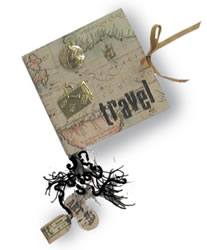
| "Travel"
album from Limited Edition Rubber Stamps |
| Materials
Needed |
 |
| |
 |
Mini album template set |
| |
|
12 x 12 travel-inspired pattern paper
for cover |
| |
|
12 x 12 plain or pattern paper for pages |
| |
|
Thin sheet of cardboard |
| |
|
Pencil |
| |
|
Ruler |
| |
|
Scissors |
| |
|
Pen for journaling |
| |
|
Acid-free adhesive |
| |
|
Charms, buttons, fibers for embellishment |
| |
| Instructions |
| |
1. |
Using the mini album cover template, lay template
on backside of pattern paper for cover and trace template with pencil.
Before removing template, use a ruler to score lines as shown on
template. Cut out cover pattern with scissors. Cut two pieces of
cardboard to fit inside the score line area of the cover. |
| |
2. |
Lay page template on backside of your paper for the
inside pages and trace around outside edges and inside openings.
Cut out pages and openings (your photos will go in the openings).
**Note: If you don’t want to cut out the openings on the page,
leave the page blank. You can crop and mount photos on top of the
page instead of behind the page. |
| |
3. |
To assemble the mini album, lay cardboard inside the
score area of cover paper, fold down flaps and adhere cover to cardboard.
Position photos behind page frames and crop as necessary. Adhere
photos to pages. After completing pages, adhere them together back
to back. Adhere the backs of the first and last pages to the inside
of the album cover to finish the album. |
| |
4. |
Decorate cover with charms, tags, buttons, or other
embellishments and journal inside. |
| |
|
**Note: If you want to attach a ribbon to tie the
album shut, do it before attaching the pages to the cover. Place
a piece of ribbon across the center of the book leaving enough length
on the outside edges to tie the ribbon together when the album is
closed. Then attach the pages to the cover over the ribbon. |
| Sponsor:
© Memory Makers 2002 |
|