Close this window to return to series
200 project listing
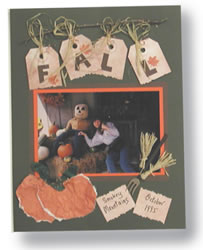
Fall
for a Scarecrow! by Julie McGuffee
Wire is a great way to add dimension
and sparkle to your scrapbook pages!
Follow these easy techniques for great embellishments.
Materials
Needed
24 gauge Artistic Wire – Gold
Fiskars Paper Edgers – Deckle
Fiskars Paper Trimmer
Craf-T Products Chalks
Xyron Re-Positionable Adhesive
4 Tags
Alphabet Punches
Dark Green Cardstock ( 8.5” x
11”)
Bright Orange Cardstock
Medium Brown Cardstock
Scraps of lighter weight paper –
Orange and Green
Leaf Punch
Twig
Natural Raffia
Jolee’s Boutique Pitchfork Sticker
Black marker
Remember to choose colors of paper and embellishments
that compliment your photographs. Colors chosen here reflect the
colors in my photographs, but may not be the best colors to choose
for yours.
Instructions
1.
Apply adhesive to the photograph. Glue to orange cardstock
then use the paper trimmer to trim the cardstock around the photograph
leaving a narrow border. Apply adhesive to the matted photograph
then glue to the brown cardstock. Trim the brown cardstock with
the deckle edge scissors.
2.
Shorten the tags by cutting in half with the deckle
scissors. Save the cut off pieces for your title/journaling. Use
a cotton ball to lightly color the tags with brown chalk.
3.
Punch the letters from brown cardstock and 3 leaves
from orange paper. Apply adhesive then place the letters and leaves
on each tag. Loop a few strands of raffia through the hole in each
tag.
4.
Crumple the orange paper, and then tear into 2 pumpkin
shapes. Tear 2 or 3 leaves from crumpled green paper and a stem
from brown cardstock.
5.
Break the twig so it is a little shorter than the
width of your background paper. Wrap with gold wire. Use the tip
of a sharp pair of scissors or a small hole punch to make two holes
in the background paper about 1” from the top and 1”
from each side. Insert the ends of the wire into the holes to attach
the twig. Apply adhesive to two small scraps of paper then place
over the ends of the wire on the back of the page to hold them in
place.
6.
Wrap wire around a narrow dowel to coil. Remove the
coil wire from the dowel then cut into 4 pieces long enough to attach
the tags to the twig. Thread one end of a coil through the hole
in the tag then hang the opposite end around the twig. Press the
ends gently together to secure.
7.
Arrange then place the matted photograph and additional
embellishments on the background paper.
8.
Attach additional coils of wire around the pumpkin
stem.
9.
Write title, or journaling on the pieces cut from
the tags then glue in place.