Close this window to return to series
200 project listing |
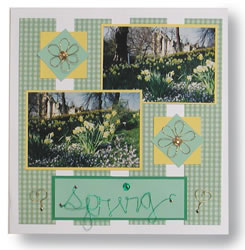
| Spring
by Julie McGuffee |
| Designing with wire is a breeze with
the right tools. Try these wire embellishments using the Wire Jig
and Wire Writer – you’ll be surprised how easy it is
to be creative! |
| Materials
Needed |
 |
| |
 |
22 gauge Copper Wire |
| |
|
Small Spool of 24 gauge Bright Green
Wire |
| |
|
Wire Jig |
| |
|
Wire Writer |
| |
|
Round Nose Pliers |
| |
|
Nylon Jaw Pliers |
| |
|
Fiskars Paper Trimmer |
| |
|
Fiskars Tiny Hole Hand Punch |
| |
|
Xyron Adhesive |
| |
|
Gold and Silver Brads |
| |
|
12” x 12” Background page
– White |
| |
|
Light Green Cardstock |
| |
|
Medium Green Cardstock |
| |
|
Yellow Cardstock |
| |
|
Green Gingham Paper – 8.5”
x 11” |
| |
| Remember to choose colors of paper and embellishments
that compliment your photographs. Colors chosen here reflect the
colors in my photographs, but may not be the best colors to choose
for yours. |
| Instructions
|
| |
1. |
Apply adhesive to the back of photographs then glue
to the yellow cardstock. Use the paper trimmer to trim the cardstock
leaving a narrow border around the photograph. |
| |
2. |
Cut two, 2” yellow squares and two, 1 3/4”
squares from light green. Punch a hole in the center of the green
squares. |
| |
3. |
Divide the green gingham paper into four equal, 11’
strips. |
| |
4. |
To make the flowers insert two of the medium sized
pegs into the wire jig about 1 1/2” apart. Wrap the copper
colored wire around the pegs three times. Cut the ends even with
the top of the loops. Remove the loops from the jig then secure
by wrapping ends of wire around the center. Spread the loops apart
to make 6 flower petals. |
| |
5. |
Make a small, tight, flat coil of wire for the center.
Attach one flower to the center of the green square by pushing the
ends of the brad through the center of the coil, the center of the
flower into the hole in the card. Spread prongs apart at the back
to secure. Glue to the yellow square as shown. |
| |
6. |
Make two hearts by wrapping about 5” of copper
wire around a marker two times. Twist the ends together then remove
the marker from the loops. Gently pull the loops apart sideways
to form the heart. Use the round nose pliers to make a loop in one
of the ends then trim the other end. Attach the heart to the page
by pushing the ends of a brad through the loop then into the paper.
|
| |
7. |
To make the title, write the word on a piece of white
paper. There should be no breaks between the letters. Thread the
small spool of green wire onto the top of the wire writer then place
the jig on top of the word you have written so that it is over the
first letter (s). Push small pegs into the jig at the points where
the wire changes direction when writing the word. Make a loop in
the end of the wire with the round nose pliers then place over the
first peg. Using the wire writer as you would a pen, slowly write
each letter following the pattern under the jig. You will need to
remove each part of the word as you write, so you move the jig over
to the next letter. You will also need to rearrange the pegs over
the word as you continue. |
| |
8. |
When you have completed the word remove the last part
from the jig. Use the nylon jaw pliers to flatten each part. NOTE:
You can also use the nylon jaw pliers to straighten the wire if
you make a mistake and wish to start over. Cut the light green cardstock
about 1” longer and 1” wider than the word. Make a green
swirl for a dot for the “i” then attach the word to
the light green cardstock with brads. Apply adhesive to the back
of the cardstock with the word attached (your Xyron machine is great
for this because it flattens the letters even more) then adhere
to a darker color of green. Trim the green so there is a narrow
border around the light green. |
| |
9. |
Apply adhesive to the matted word, photographs, yellow
squares and gingham strips. Starting with the outer ones first,
glue the gingham strips to the background paper. Arrange then glue
the other embellishments in place. |
| Sponsor:
Artistic Wire |