Close this window to
return to series 200 project listing
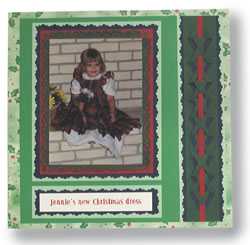
Borderline
Decorations by Julie McGuffee
Decorative scissors and border punches
are great tools for creating borders. With many different designs
to choose from combine both techniques for an elegant and intricate
look.
Materials
Needed
Fiskars Templates – Diamonds
Fiskars Shape Cutter
Fiskars Paper Trimmer
Fiskars Paper Edgers
Fiskars Border Punch
Xyron Re-positionable Adhesive Cartridge
12” x 12” Background Paper
– Holly
Cardstock – Red, Dark Green, Medium
Green ( 8.5” x 11”), Light Green, Dark Blue and scrap
of White
ZIG Memory System Writer - Black
Remember to choose colors of paper and
embellishments that compliment your photographs. Colors chosen here
reflect the colors and theme of my photographs, but may not be the
best color choices for yours.
Instructions
1.
Cut the dark green paper about 1”
wider and 1” longer than the photograph then use the border
punch to create a decorative border all around the edge. Apply adhesive
to the photograph then center on the mat. Apply adhesive to the
matted photograph then place on red paper. Trim the red paper so
that it is just a little wider than the edge of the green mat. Apply
adhesive then place on dark blue paper. Use decorative scissors
to trim the edges. Apply adhesive then place on light green paper.
Trim with the paper trimmer.
2.
Mat a white journaling block in the same
manner using dark blue and light green paper. The matted block should
be the same width as the matted photograph. Apply adhesive to the
matted journaling block and the photograph then place on the medium
green sheet. At this point you will have created an 8.5” x
11” scrapbook page.
3.
To extend this page to a 12” x
12” you will need to make an additional border about 2.5”
wide and 11” long. To create the chevron border shown on the
sample use the diamond shape template and shape cutter to cut a
series of “V” shapes about 1/2” apart down the
length of an 11” sheet of paper. The “V” is lower
part of the diamond shape. Use the guides on the template to keep
them evenly spaced and the same distance from the edge of the paper.
With the line of “V”s at the center cut the green paper
to form an 11” strip about 1 3/4” wide.
4.
Starting at the top, fold the first “V”
shape upwards. Fold the third upwards tucking the point under the
point revealed when the first V was folded up. Continue folding
every other V upwards to complete the pattern.
5.
Cut an 11” strip of red paper about
1/2” wide then thread down the center of the pattern created
if desired. Apply adhesive then place on dark blue paper. Trim each
side with the decorative scissors then adhere to light green paper.
Trim evenly on both sides so that the finished width of the border
strip is 2 1/2” wide. Attach to the background paper.