Close this window to return to series
200 project listing
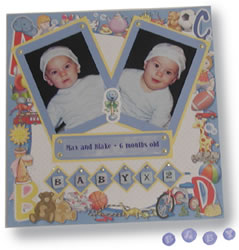
Baby
x Two by Julie Mcguffee
If you’re looking for new ways
to add dimension to your scrapbook page, you may want to try making
alphabet tiles using clay and Metallic Rub-Ons.
Materials
Needed
Craf-T Products Metallic Rub-ons
Fiskars Corner Flower Punch
Fiskars Paper Trimmer
Fiskars Hand Punch – 1/8”
Hole
Hot Off the Press Punch out
White Clay
Fixative Spray
Cotton Swabs
Small Gold Brads
Xyron Adhesive Cartridge
Glue Dots
Alphabet Rubber Stamps
Black Archival Rubber Stamp Ink Pad
Glue dots
Small Brass Brads
Vellum Sheet
Medium Blue Cardstock
Yellow Cardstock
Patterned background paper (paper from
Design Originals baby book used here)
Remember to choose colors of paper and embellishments
that compliment your photographs. Colors chosen here reflect the
colors in my photographs, but may not be the best colors to choose
for yours.
Instructions
1.
To make the tiles slice the white clay into small
blocks about 1/8” thick. Following directions on packaging,
place the clay pieces on wax paper on a baking tray. Bake in a 275
deg. oven for about 8 minutes. Remove then let cool.
2.
Using a cotton swab, or your finger, cover the top
and sides of each tile with the metallic rub on color of your choice.
Let dry thoroughly then stamp each with the appropriate alphabet
letter. Let dry then spray with a fixative if desired.
3.
Cut a mat for each photograph 1” longer and
1” wider than the photo. Use the punch to trim the corners.
Apply adhesive to the back of each photo then adhere to the center
of the blue mat. Apply adhesive to the back of each mat then adhere
to yellow cardstock. Trim cardstock around the edge of the blue
mat leaving a 1/8” border.
4.
Handwrite, or use a computer to write the title on
a piece of vellum about 1” wide. Mat the title with blue and
yellow cardstock in the same manner as the photographs.
Use the hand punch to make a hole in the center of
each flower punched in each corner of the blue photo and title mats.
Place a brad in each hole except in the bottom center holes where
the photos overlap.
Cut a blue, 1” square for each letter tile then
mat with yellow. Punch a hole in one corner of each matted square
then insert one brad in each hole. Adhere a tile to each square
with glue dots.
Arrange then adhere the photos, title and journaling
to the background paper. Place a punch out over the area where the
photos overlap if desired.
NOTE:
For this scrapbook page I made a single enlargement of each baby
from one photograph of both babies using the Kodak Picture Maker.