Close this window to return to series
200 project listing
Mini
Postcard Album by Sandy Laipply
Materials
Needed
An assortment of your favorite postcards
1 sheet each blue, black and fuchsia
cardstock
Xyron 510 with Permanent Adhesive Cartridge
Fiskars Personal Paper Trimmer
Rollabind Opaque Blue Binding Discs
Rollabind Personal Hand Punch
Ruler
Pencil
Computer and printer
Instructions
1.
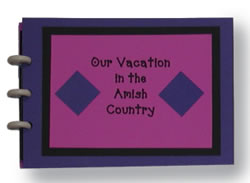
Make the front cover. Cut a 4 ½” x 6
½” piece of blue cardstock. Mark center of one short
side. Punch with personal paper punch.
2.
On computer, make a 3 ½” x 5” rectangle.
Center desired title inside this rectangle. Print on fuchsia cardstock.
Cut with personal paper trimmer. Run thru Xyron machine.
3.
Cut 2 one-inch squares of blue cardstock Run thru
Xyron machine to apply adhesive backing. Adhere to both sides of
title, turning squares on point to make diamond shapes.
4.
Mount onto a 4” x 5 ½” rectangle
of black cardstock. Run this through Xyron machine. Adhere to blue
punched rectangle.
5.
Make the back cover. Cut a 4 ½” x 6 ½”
rectangle from both blue and fuchsia cardstock. Run one rectangle
through Xyron machine, and adhere 2 rectangles together. Mark center
of one short side, and punch holes in line with those on the front
cover.
6.
Lay out postcards, right side up. Mark center of the
left short side of cards. Punch holes.
7.
Attach binding discs to cover by slipping discs into
punched openings. Lie covers with discs attached on a flat surface
and open with right sides down. Place several postcards on top of
back cover so holes align with binding discs. Using 2 fingers, press
down on either side of discs to bind pages. Repeat to attach as
many postcards as desired.