Close this window to return to series
200 project listing
Penguins
on Parade! by Julie McGuffee
Paper folding is an art in itself and
has been around for many, many years. Origami books are full of
wonderful ideas and paper folding techniques just perfect for scrapbook
pages!
Materials
Needed
Fiskars Paper Trimmer
Fiskars Tiny Hole Hand Punch
Xyron Re-positionable Adhesive Cartridge
Xyron “X” Sticker Maker
12” x 12” Background Paper
– Medium Blue and Light Blue pattern
Cardstock – Medium Blue and scrap
of White
White and Black lightweight paper
Punched or die cut letters for title
8 Small Silver Brads
Prism Glitter
Glue
Sparkle Thread to embellish
ZIG Memory System Writer - Black
Remember to choose colors of paper and embellishments
that compliment your photographs. Colors chosen here reflect the
colors and theme of my photographs, but may not be the best color
choices for yours.
Instructions
1.
Mat photographs and white journaling block with medium
blue paper. Trim around edges with paper trimmer.
2.
Trim 1/2” from the length and width of the light
blue patterned background paper then adhere to the center of the
medium blue background.
3.
To make the title cut a 11” x 2.5”piece
of medium blue paper. Punch a hole at each corner about 1/4”
from corner edges. Attach to the upper part of the page with a silver
brad at each corner. Wrap sparkle thread around the brads to frame
the rectangle.
4.
Punch letters for title form light blue paper. Adhere
to the title block. Add glitter to the top of each letter for “snow”.
5.
Punch a hole in each corner of the journaling block
then place a silver brad in each corner. Referring to the project
photo for placement idea, adhere the photographs and journaling
block to the page.
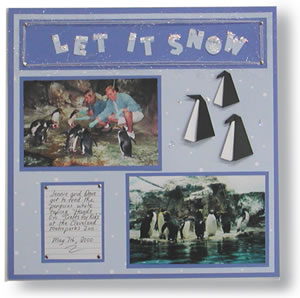
6.
You will need a 2” square of white paper and
a 2” square of black paper for each penguin. The size of the
squares will determine the finished size of the penguin. Make the
penguins as follows: Fold the white square in half diagonally, and
then open up the paper. Fold the point on the right of the fold
line over towards the center. The straight edge will lie along the
centerfold. Repeat with the point at the other side. You will now
have a kite shape. Fold the upper point straight down over where
the two outside points meet then crease so the point lays over the
centerfold line. You will now have a triangle shape. Fold the uppermost
point down toward the center fold about 1/2”. Fold the outside
edges inward together using the original center fold line as a guide.
The triangle is now folded in half. Fold the outer points of the
triangle inwards about 1/2”. Repeat with the black square
except for the very last folding step. When the triangle is folded
in half, carefully pull the top point that you folded down outward
and upward to form the beak. Now place the folded white piece of
paper inside the folded black paper to form the front and back of
the penguin as shown.