Close this window to return to series
200 project listing |
| Fall
At The Farm |
| Materials
Needed |
 |
| |
 |
A favorite 4” x 6” picture
and a KODAK Picture Maker |
| |
|
12” x 12” cardstock in orange/red
and brown/red |
| |
|
Orange Mulberry paper |
| |
|
Black pen |
| |
|
Lettering stickers |
| |
|
Copper wire |
| |
|
Hole punch and eyelet setter |
| |
|
Metal edged ruler |
| |
|
Cutting mat marked with 1” grids |
| |
|
Craft knife with a fresh, sharp blade |
| |
|
Fiber |
| |
|
Orange eyelets |
| |
|
Double-sided adhesive |
| |
| Instructions
|
| |
1. |
Enlarge a favorite picture,
two ways. Take your feature photo to a KODAK Picture
Maker and follow the on-screen directions to Select an 8”
x 10” enlargement. To get the full-color enlargement, Scan
your original picture and Print it. Follow the same step again –
but to create a black and white enlargement, this time choose Scan
Black and White Picture. And Print. |
| |
2. |
Go ahead and cut your
pictures. First, trim the white edges away from
each 8” x 10” enlargement. Then place the color enlargement
face down on your cutting mat with the grids, and secure it with
removable tape. Use a photo-safe pencil to lightly mark 1”
Horizontal lines across the back of the picture using a metal-edged
ruler. Number the strips from the top to the bottom, from 1 to 8.
Next, using the craft knife, metal ruler, and cutting mat, carefully
cut apart the strips of the color picture, being careful to keep
them in order. |
| |
3. |
Now cut the black and
white picture. In the same style, place the black
and white enlargement face down on your cutting mat with the grids,
and secure it with removable tape. Use a photo-safe pencil to lightly
mark 1” Vertical Lines across the back of the picture using
a metal-edged ruler. Mark the strips with letters )to distinguish
them from the strips of the color picture), form A to J. Use the
craft knife, metal ruler, and cutting mat to cut apart the strips
of the black and white picture, being careful to keep them in order. |
| |
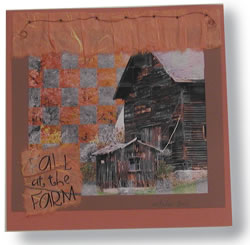
4. |
Weave the pictures together.
Turn both pictures over so that the photo side is up and line up
the strips as if the picture was not cut. On your work surface,
place the color picture directly in front of you, and the black
and white picture off to your right. Starting with the upper left-hand
corner, bring in a black and white vertical strip and begin weaving
it over and under the color strips. Do the same with the rest of
the black and white strips, being careful to line up elements of
the photos – such as the barn or tree trunks shown in our
layout. Once the picture is all lined up with all the strips, place
a small piece of adhesive under the loose edges to secure the picture
together. |
| |
|
Frame it in a picture
window. Use a 12” paper trimmer and the brown/red
cardstock to cut a picture window-style from the place over the
woven picture. Adhere the frame to the woven picture, and adhere
both to the orange/red cardstock background. |
| |
|
Hang a curtain on the
window. Wet and tear a 2” strip of orange
Mulberry paper to create the window’s curtain. (if you are
using 8 ½” x 11” Mulberry paper, tear two strips
and overlap them to be able to cover the entire width of the “window”
frame. Place the Mulberry paper above the top of the window frame,
being careful not to cover too much of the feature photo. Every
couple of inches, create a fold in the Mulberry paper and secure
it with double-sided adhesive. Punch seven to eight holes across
the top of the Mulberry paper and attach orange eyelets. Weave the
copper wire through the eyelets going both directions, and curl
the excess on the front around a pencil for a curled finish. |
| |
|
Don’t forget the
title. Tear a small piece of Mulberry paper for
the title block, and use lettering stickers to form the words. Wrap
fiber around the title black and secure it on the back. Attach the
title block to the page in the lower left-hand corner. Add the date
with a black pen. |
| Sponsor:
Eastman Kodak Co. |
|