Close this window to return to series
200 project listing
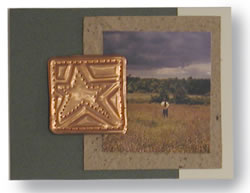
"Punched"
Copper Card
Materials
Needed
American Traditional Stencils® –
Star Light stencil #MSP-19
American Traditional Stencils® -
Embossing tool (#ET)
Metal Works™ - Copper Specialty
Metal Sheet (2 ¼” x 2 ¼”)
4 ¼” x 5 ½”
Ivory note card
4” x 4 ¼” Deep green
cardstock
3 ¾” x 3 ½”
Hand made paper
Felt or foam pad, sized larger than
the copper piece
Wooden burnisher or spoon
Pushpin
Photo of choice (approx. 2 5/8”
x 2 7/8”)
Scissors
Glue
Low tack tape
Instructions
1.
Attach stencil to copper with tape. Turn copper over
and place on felt pad. Rub burnisher over the back of the copper
to reveal outline of stencil design. Deepen the image by using the
embossing tool to outline the stencil design again. Turn the copper
piece over and remove the stencil.
2.
With the right side facing up, place the embossed
copper piece on the felt pad. Using the pushpin, carefully “punch”
holes, approximately 1/8” apart, along the outline of the
star and the outer edge.
3.
Use the scissors to carefully trim the copper, leaving
a narrow border.
4.
Refer to the model for suggested placement and layer
the following on the front of the note card: green cardstock, handmade
paper, photo, and “punched copper”. Crop papers and
photo as needed and glue in place to secure.