Close this window to return to series
300 project listing |
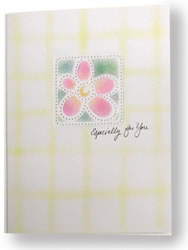
| Pierced
Card by Barbara Swanson |
| Materials
Needed |
 |
| |
 |
Piercing Template, #PC-007, Fun Flower |
| |
|
Piercing Tool, #ET-4 |
| |
|
Light Table, #LB-2 |
| |
|
Embossing Tool, #ET |
| |
|
3/16” brushes, #B-4 (optional) |
| |
|
Decorating Chalk Set, #DC-Set-1 |
| |
|
White Note Cards with envelopes, #NC-0 |
| |
|
(Note: all the products listed above
are available from American Traditional Designs) |
| |
|
Low tack tape |
| |
|
Ruler |
| |
|
Paper towels |
| |
|
Piece of ¼” foam |
| |
|
Black fine point marker |
| |
| Instructions |
| |
1. |
Tape the template to the card front. Turn the card
over, having the paper side face up, and place on the light table.
Rub the card with your fingers to put a light coating of natural
moisture/oil on the back of the paper. This allows the embossing
tool to glide more easily. Trace the lighted design (flower and
frame) with the embossing tool. |
| |
2. |
Turn the card over, template side up, and leave the
template taped in position. Place the card on the foam pad and pierce
with the piercing tool. (Note: if you pierce up and down versus
at an angle, you’ll find a “rhythm” and the piercing
will be easier.) |
| |
3. |
With the template still in place, add color using
the chalk and an applicator. Start with yellow at the center. Then
add hot pink to the petals. Blue and green were used for the background
of the square. (Note: slightly damp stencil brushes were used for
the sample to achieve stronger colors.) |
| |
4. |
Remove the template. Using chalk and a brush, add
a “plaid” pattern either free hand or with the aid of
a ruler. |
| |
5. |
If desired, use a fine point marker to write a sentiment. |
| Sponsor:
American Traditional Designs |
|