Close this window to return to series
300 project listing
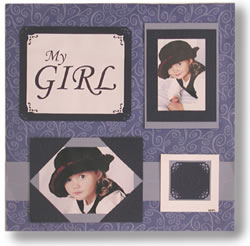
"My
Girl" Scrapbook Page by Beth Madland
Materials
Needed
1 sheet of decorative paper
white 81/2 x 11 cardstock
blue 12 x 12 cardstock
light blue 12 x 12 cardstock
Fiskars Lace 3 in one corner punch
Fiskars Mini Shape Boss
Fiskars Mini Shape Boss starter kit
stencil
Fiskars Paper Trimmer
Fiskars Micro-tip scissors
Adhesive
Instructions
1.
Position the stencil on the Mini Shape Boss –
making sure the clear stencil is on top.
2.
Cut a strip of light blue cardstock and slide it in
between the two stencils underneath the wavy line design.
3.
Using your embossing tool, gently press along the
wavy line design. Your impression will show through on the side
of the paper that’s facing down. You may need to life your
light blue paper and position it again to extend the wavy line.
4.
Lay this strip along the bottom third of your decorative
paper.
5.
Matte larger photo in light blue cardstock.
6.
Take a piece of dark blue cardstock that is slightly
bigger than your matted photo.
7.
Insert a corner of the dark blue rectangle in between
the stencil underneath the corner design on the stencil.
8.
Using embossing tool, gently emboss the corner design
onto the cardstock. Repeat on all four corners of the cardstock.
9.
Cut the design from the cardstock – one corner
at time. Each design will resemble a rectangle. Because you used
a larger rectangle than the matted photo you should be able to cut
along the corners and not cross over the design of another corner.
You can use Fiskars micro tip scissors or your Fiskars Paper Trimmer.
10.
Lay your matted photo on top of the light blue border
strip. Adhere the triangles on each corner of the matted photo making
sure to line up your triangles flush with the corner of the matted
photo.
11.
Matte (but don’t adhere) the smaller photo onto
dark blue cardstock with a 5/8 of an inch border around the photo.
Matte the dark blue cardstock onto the light blue cardstock. Leave
some space at the top and bottom for extra embossing.
12.
Emboss the curly q design around the edges of the
blue matte. One tip is to start in the middle of the border and
emboss out so you can estimate what will fit on the matte.
13.
Emboss a row of five dots on the bottom and top of
the light blue cardstock matte.
14.
Using adhesive, adhere the mattes together and place
the matted photo in the upper right hand corner of the scrapbook
page.
15.
Take a scrap piece of the dark blue cardstock and
emboss the heart shape design. Trim around the design with the paper
trimmer so you have a 2 inch square.
16.
Use the Fiskars Lace three in one corner punch and
punch each corner of the dark blue cardstock.
17.
Matte the blue cardstock onto the light blue cardstock.
Matt that onto a piece of white paper that’s folded at the
top. This can be a journaling block or accent to be placed on the
embossed border strip.
18.
Print out the words “my girl” onto a piece
of white cardstock. Trim the cardstock.
19.
Use the Fiskars Lace three in one corner punch and
punch each corner of the white cardstock. Matte this onto the dark
blue cardstock . Using the same corner punch (but a different design)
punch out each corner of the blue cardstock.
20.
Place title in the upper left corner of the page.
Some Tips:
1.
Rub cardstock with wax paper before embossing –
it will help the embossing tool glide along the paper better!
2.
When using the Fiskars three in one corner punch I
always turn the punch over to make sure the corner of my paper is
inserted properly – otherwise the punch may be off-center.
3.
When embossing on decorative paper make sure the decorative
side of the paper is facing down in between the two stencils.