Close this window to return to series
300 project listing
Quick'n
Easy Cards - Sunburst Border
by Julie McGuffee
Make multiples of the
same card quickly and easily with the Card Boss system!
Materials
Needed
Fiskars Shape Boss and Embossing Tool
Fiskars Embossing Stencil Set –
Square Burst
Fiskars Border Punch – Sunburst
Fiskars 3 in 1 Corner Punch –
Lace
Fiskars Photo Memories Cardstock –
Country Burgundy, Green & Tan
Fiskars Micro Tip Scissors
12” x 12” Black Cardstock
4 Gold Star Brads
Dark Green fiber
Xyron 900 Machine and re-positionable
adhesive cartridge
Remember to choose colors of paper and embellishments
that complement your photographs. Colors chosen here reflect the
colors and theme of my photographs, but may not be the best color
choices for yours.
Instructions
1.
Use the Square Burst embossing stencil and Shape Boss
to emboss a border around all 3 sides of the burgundy cardstock.
2.
Emboss the same design along the bottom edge of the
black cardstock aligning the pattern and moving the paper over to
finish.
3.
Apply adhesive to the back of the burgundy cardstock
then position on the upper part of the black cardstock leaving a
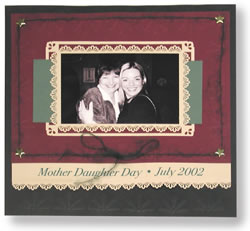
half inch border at the top and each side. (Refer photo for placement.)
4.
Cut a strip of tan paper 2” x 11” for
the title. Aligning the edge of the paper with the end of the pattern
on the border punch, punch the design along the edge of the strip.
(Print titles before embellishing for correct spacing.)
5.
To mat a 4 x 6 photo, cut a mat 5.5 x 7.5 from tan
cardstock. Use the sunburst border punch to punch the design around
the edge of the mat, starting and finishing one half from the edge
of the mat. Use the 3 in 1 punch to punch a design in each corner.
6.
Attach the photograph to the center of the mat with
adhesive. Cut a 3.5 x 8.5 strip of green paper. Slide through the
openings on the mat as shown. Attach the matted photograph to the
center of the burgundy cardstock and the title beneath the bottom
edge.
7.
Make a hole at each corner of the burgundy paper with
the tip of the scissors. Insert a star brad at each corner. Wrap
fiber around the stars. Tie ends at the center below the photograph
to finish.
Tip:
Place the template on top of the embossed design then
chalk lightly if desired.