Close this window to return to series
300 project listing
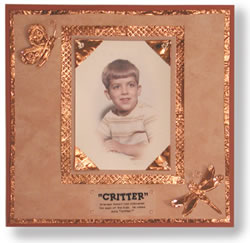
"Critter"
Scrapbook Page by Beth Madland
Materials
Needed
Fiskars Shapeboss
Fiskars Shapeboss Critter stencil set
Fiskars Bugs three in one corner punch
Fiskars Honeycomb texture plate
Fiskars Paper Trimmer
Copper colored foil or thin meta
Four brass colored eyelets
Cream cardstock
Tan decorative paper
12x12 sheet of Rust cardstock
Copper colored wire
Instructions
1.
Attach honeycomb texture plate to ShapeBoss.
2.
Place a piece of copper colored foil face down on
texture plate. Use embossing tool and rub the plate back and forth
until the honeycomb texture reveals itself. Continue this design
so a large piece of copper foil has texture.
3.
Matte the picture on cream cardstock and then onto
the copper foil that has texture. Place this on the tan decorative
paper (that you’ve trimmed on each side by ¼ of an
inch). Do not adhere the picture to the mattes yet.
4.
Remove the texture plate and assemble the Critter
Stencil set on the ShapeBoss.
5.
Place the copper foil in between the two stencils
making sure the copper side of the foil is face down. Use embossing
tool and gently emboss around the edge of the dragonfly and butterfly
designs.
6.
Remove the foil and trim each design – leaving
1/8 of an inch of foil around the design.
7.
Curl four pieces of copper colored wire into small
antlers for the butterfly and the dragon fly.
8.
Adhere two antlers to each design and place on the
page.
9.
Take strips of foil and crumple them in your hands.
Wrap the strips of foil along the edge of each side the tan decorative
paper. Adhere the tan paper to the rust paper with adhesive.
10.
Take a strip of copper colored foil and wrap it around
the corner of the picture. You are creating photo corners. Make
four of these. Before trimming the corner – place the corner
in the Bugs three in one corner punch. Punch out the design. Trim
the photo corners and place corner of each picture in each photo
corner.
11.
Create a title and use eyelets to adhere the title
to the bottom of the page.
Some Tips:
1.
Embossing on foil or metal can be tricky. The best
advice is emboss slowly and don’t push too hard – you
may punch through the foil.
2.
Using the three in one corner punches are easy. To
make sure I’ve inserted the corner of my paper all of the
way I turn the punch over and check to make sure it’s centered.
3.
Use small clear adhesive rectangles (often used with
vellum) when adding adhesive to metal. The larger white square adhesives
tend to show through the foil over time. I try to use as little
adhesive with the metals and foils as possible.