Close this window to return to series
300 project listing
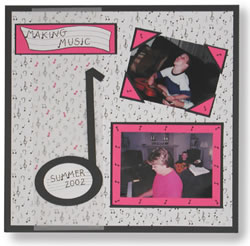
"Musical
Note" Scrapbook Page by Beth Madland
Materials
Needed
Fiskars Musical Note Hand Punch
Fiskars Shape Cutter Tool
Fiskars Oval Shape Cutter Template
Fiskars Banners 1 Shape Cutter Template
Fiskars Craft Matte
Fiskars Paper Trimmer
Black cardstock
Hot pink cardstock
White Cardstock
Musical note decorative paper
Vellum
Instructions
1.
Trim each side of musical note decorative paper and
mount on black cardstock.
2.
Cut a vellum strip (about four inches wide) and lay
it down on the left side of layout.
3.
Matte one photo on hot pink cardstock. Punch out design
along the matte using musical note hand punch. Collect the hot pink
punches. Mount the matted photo on black paper.
4.
Do not matte the second photo. Instead take a rectangle
piece of hot pink cardstock and punch a musical note in each corner.
Trim the corners of the rectangle so that you have four hot pink
photo corners with musical notes punched out. Mount the hot pink
photo corners on black paper and trim them. Adhere the photo corners
to each corner of the photo. Place both photos on the page.
5.
You will use the Shape Cutting tool for the large
musical note. Place a piece of black cardstock on your craft matte.
Next place the Ovals shape cutter template on top of the paper making
sure you can read the word Fiskars. (If it’s on the wrong
side it will be difficult to cut). Using the shape cutting tool,
cut a small oval out of the paper and discard the oval. Next, position
a larger oval around the empty oval space on your cardstock. Make
sure it’s even on all sides. Cut out the larger design. Cut
a white oval using the same larger oval portion of the template.
Mount the white oval on the back of the black oval with the center
cut out.
6.
Cut a narrow strip of paper with the paper trimmer.
This is the stem to your note.
7.
Place the large musical note on top of the vellum.
This can be a journaling block. I used the punched out small musical
notes as part of my letters.
8.
For the title, use the Banners 1 Shape Cutter template.
You will not need to cut it out. Instead use the template as a guide
to make a musical staff on white paper. Add your title and mini
punched musical notes to the title. Mount on hot pink cardstock
and then on black cardstock. Place the title block in the upper
left hand corner of the page.