Close this window to return to series
300 project listing
Photo
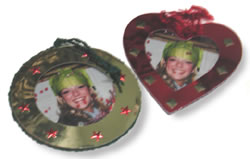
Shakers by Julie McGuffee
Make your photos shake,
rattle and roll by turning them into shakers! Shakers are
perfect accents for scrapbook pages, but these are a project in
themselves.
Materials
Needed
Fiskars Templates – Circles and
Hearts
Fiskars Shape Cutter
Sheet of Acetate (Transparency Film)
White Paper glue
Corrugated paper
Small Beads
Photographs
Remember to choose colors of paper and embellishments
that complement your photographs. Colors chosen here reflect the
colors and theme of my photographs, but may not be the best color
choices for yours.
Instructions
1.
Cut the circles (or other shape) for your shaker as
follows:
Base: 4” Circle
Top Ring: 4” Circle with 2.50” center hole. TIP -
Cut the center circle first then the 4” circle around the
outside.
Acetate and photograph: 3.50” Circles.
Spacer rings: 4” Circle with 3” center hole. Cut 2
or 3 depending how deep you would like your shaper to be. TIP:
Cut from the smooth side of the paper.
2.
Assemble in the following order:
Glue the photograph to the center of the base. (Right side of
base circle faces out.).
Glue the spacers on top of the photograph aligning the edges.
Sprinkle beads on top of the photograph.
Center, then glue the acetate circle on top of the spacer rings.
Glue the top ring in place with the right side facing upward.
3.
Embellish the photo shaker as desired. Glue fibers
around the outside to make
a hanger to use shaker as an ornament.
TIP:
Foam can also be used as a spacer. Use the template to draw the
pattern on the foam then cut out shapes with Fiskars micro tip scissors.